Getting Started with MaxTAF
Getting Started with MaxTAF has been designed to be as smooth as possible.
All you need to start is:
- A working computer with internet access
- Any modern browser
Registration
To create an account, go to mx1.maxtaf.com.
From there you will be presented with a sign in screen
Click the ‘register’ tab, and put in your details
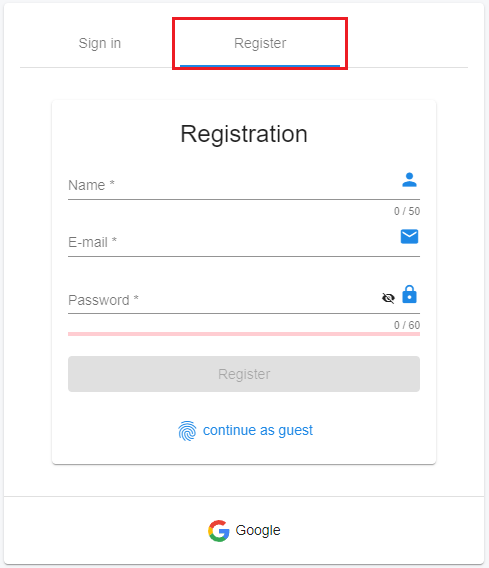
You will need to confirm your email address by following the link in your inbox once you have confirmed.
Projects
The first area of MaxTAF you arrive at is the projects screen.
Projects are essentially unique sets of data, cases, suites and settings. They are useful for partitioning test data, and as the name suggests, should be used on a project to project basis.
All users are automatically added to the community ‘examples’ project. If you wish to contribute to this, you may do so, but for testing your own system with your own cases, it is necessary to create your own project.
Creating your First Project

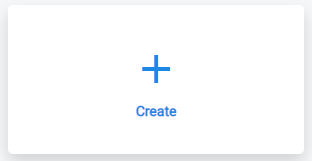
- Click the ‘+’ button, to create a new project.
- Enter a name for the project and confirm.
Cases
When you have created your first project, you are taken to the project home page. From here, the choice of next activity is entirely optional, as you have now set up the minimum requirements for your own personal MaxTAF project.
However, typically the first thing to do will be to create a case. Like any automation strategy, everything revolves around your cases. You can create a Case from the home page.
If you already have cases, libraries, Selenium IDE recordings or anything else from an existing set-up you wish to import, please follow the instructions here:
Importing Cases or SuitesAdding Libraries
Instructions for Selenium IDE import to be added
Navigating to the Workspace
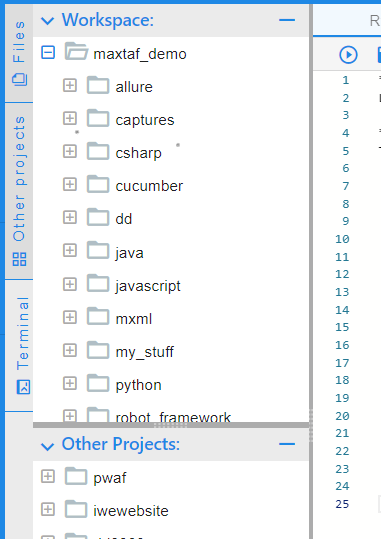
Click on "Workspace" in the left-hand navigation menu.
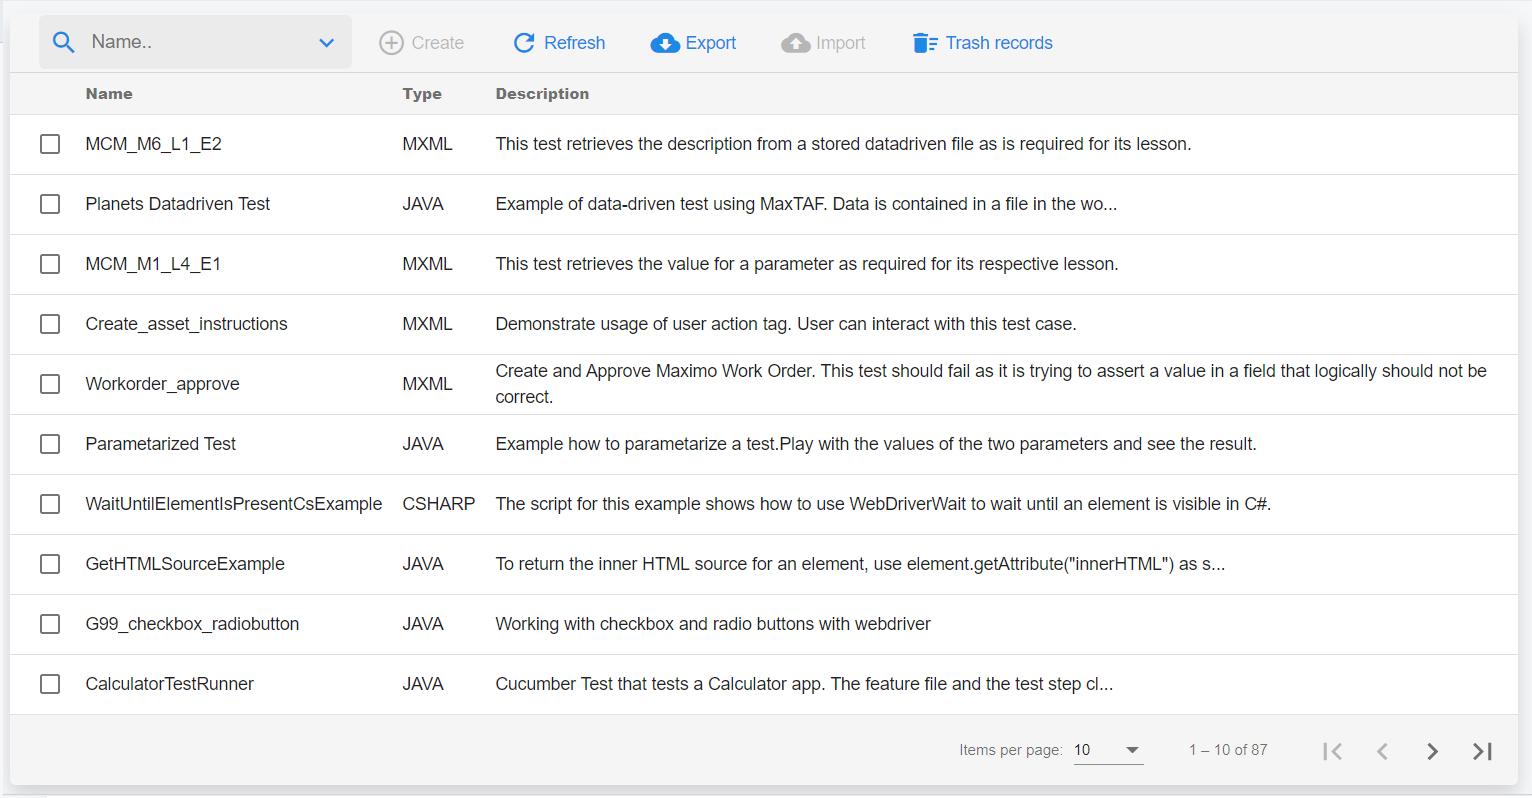
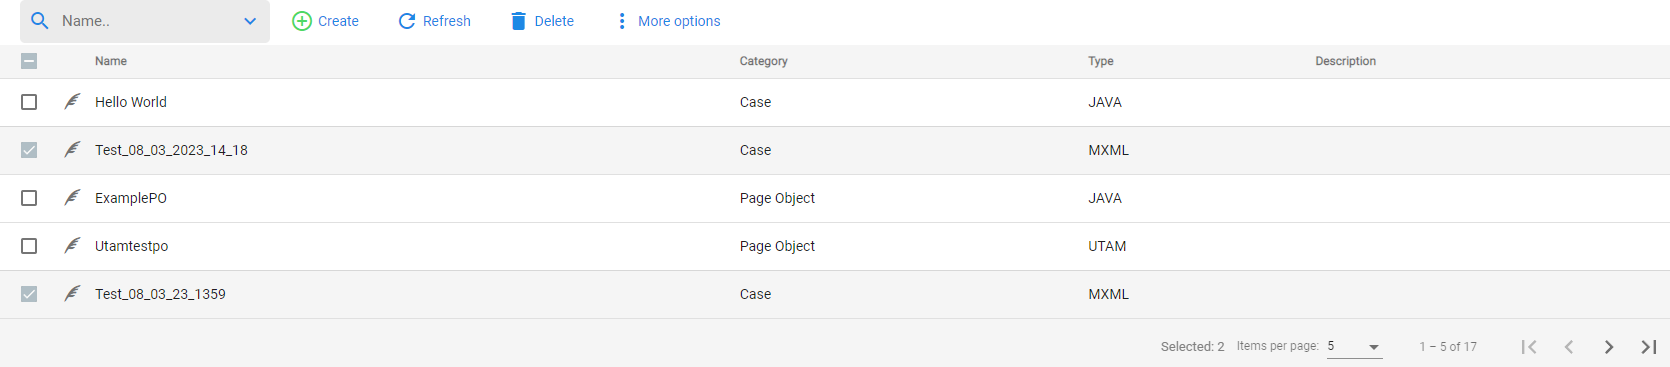
This is the Workspace, which displays all the cases and page objects in your project. Later we will organise these items into groups called suites, but for now let’s create our first case. The above screenshot is taken from the Examples project.
You can read more about the Examples project here.
Creating a case
You have a few options for creating a case.
This guide will lead you through the process of creating a new case in the most standard fashion.
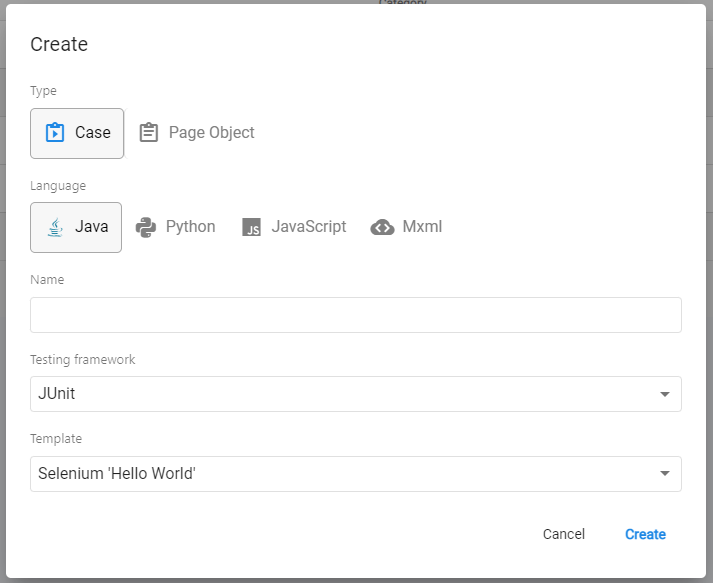
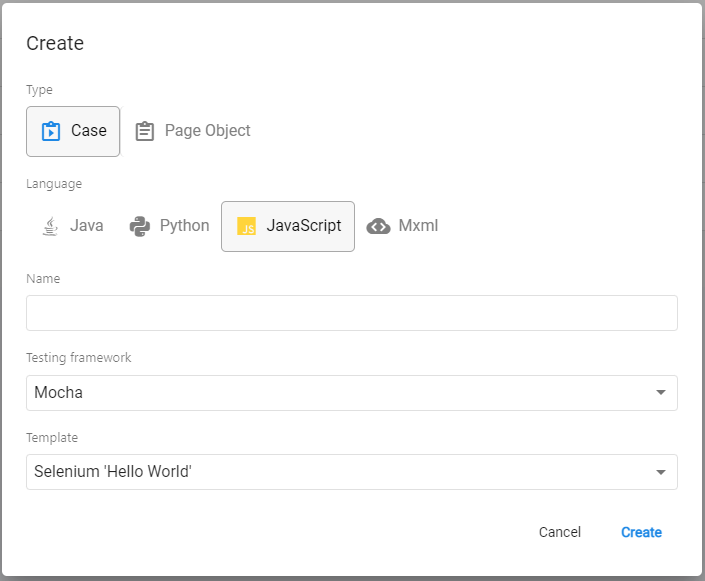
- Click ‘Create’ to create a blank case
- In the dialogue box, fill in the name and details for your preferred language and framework
- Select the "Selenium 'Hello World'" Template (see note) using the template drop-down menu

Congratulations- you have created your first case. This Case will navigate to Wikipedia, search "Hello World" using the search box, and then assert that the page title is correct.
Note: For your learning purposes, we would recommend that you use one of our templates - templates are user configurable pre-made cases. Typically, these would act as starting points for cases of a particular class, e.g navigate through login -> click on user profile -> (steps to be defined). They essentially save time in certain, common, situations in your QA regime.
Running your first case
To run the case you created, press ‘Run’, and then ‘Run’ again in the following dialog.
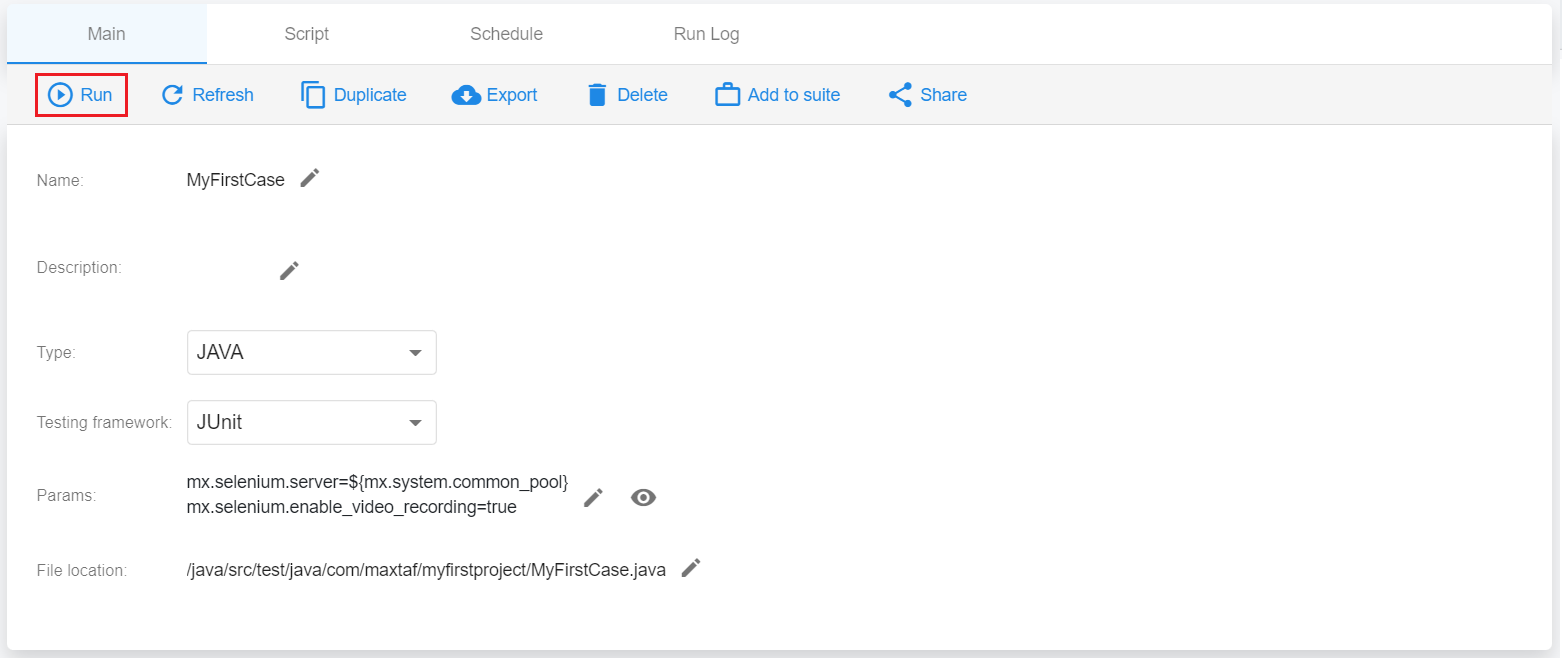
The MaxTAF live Video function will show you a live feed of the browser as the case executes each step. You can see this in the run details after starting the case run.
Read more on live Videos here.
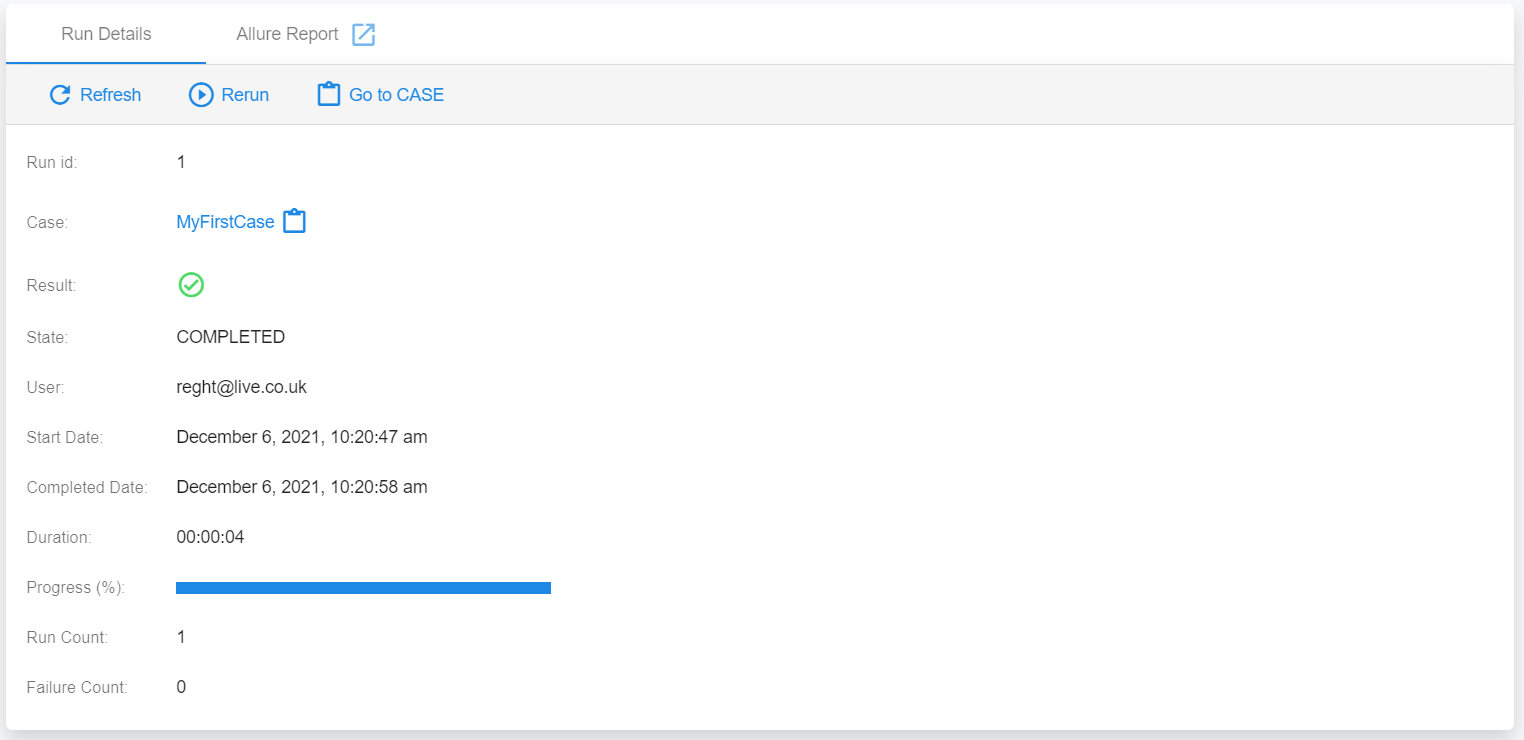
Once completed, you will be taken to a report of the run with key information such as run-time and whether the case passed/failed will be produced.
In the report, once the case has finished, the "live video" section will be replaced with ‘video’. This section, as you would expect, contains a video recording of the case, so you can see what happened when it ran.
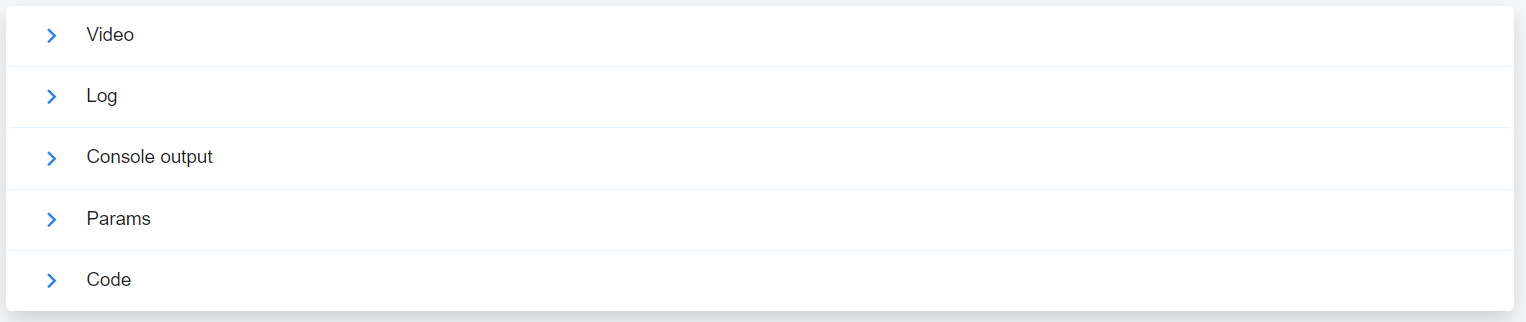
Read more on video recordings here.
Editing your First Case
All development tasks for a case can be managed from its respective page in MaxTAF. This includes scripting.
We will now show you how to edit a script from a case.
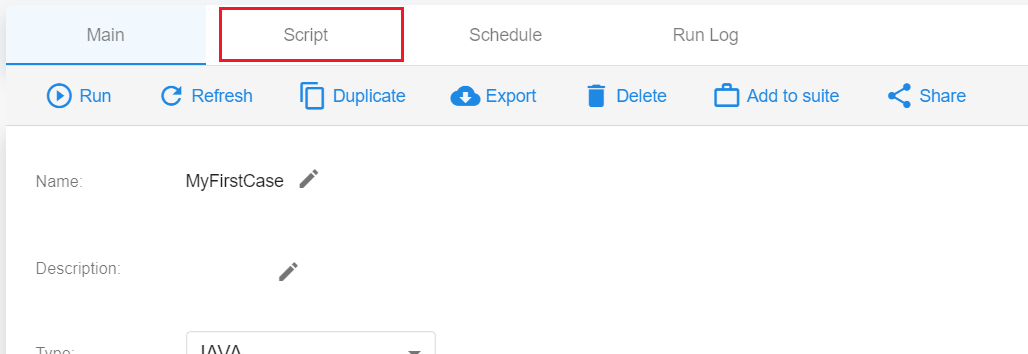
- Head back to the case by clicking either ‘go to case’ from the report that was opened in the last section, or by going back to cases and selecting your case.
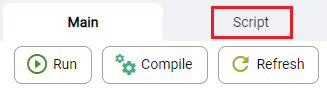
- Click on the ‘Script’ tab.
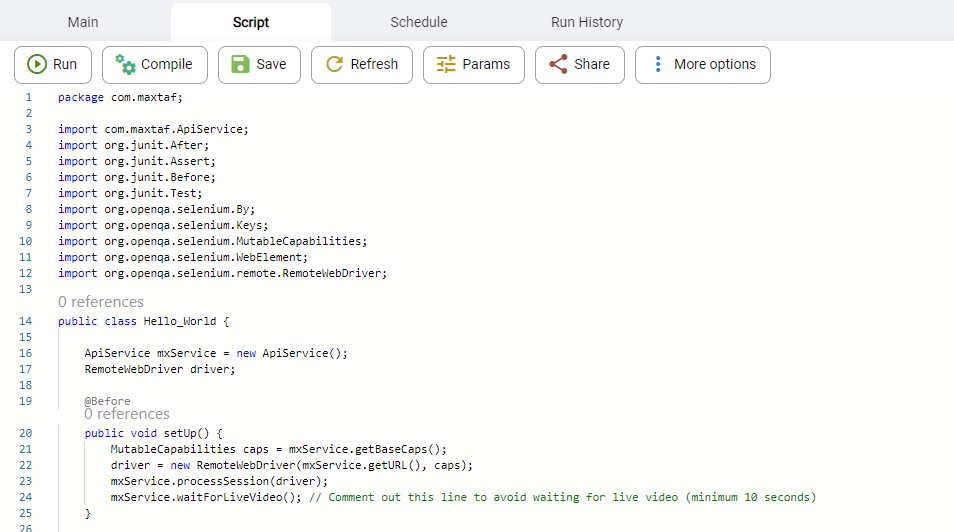
- Click ‘Run’ (Hotkey Tip: Alt + r to run case from script tab), and can check to see if your code has compiled correctly and runs. Running cases will first save and compile the code, similarly pressing compile (Hotkey: Alt + c) will automatically save the case first.
This will present you with an editor, which contains the lines of code used by the script.
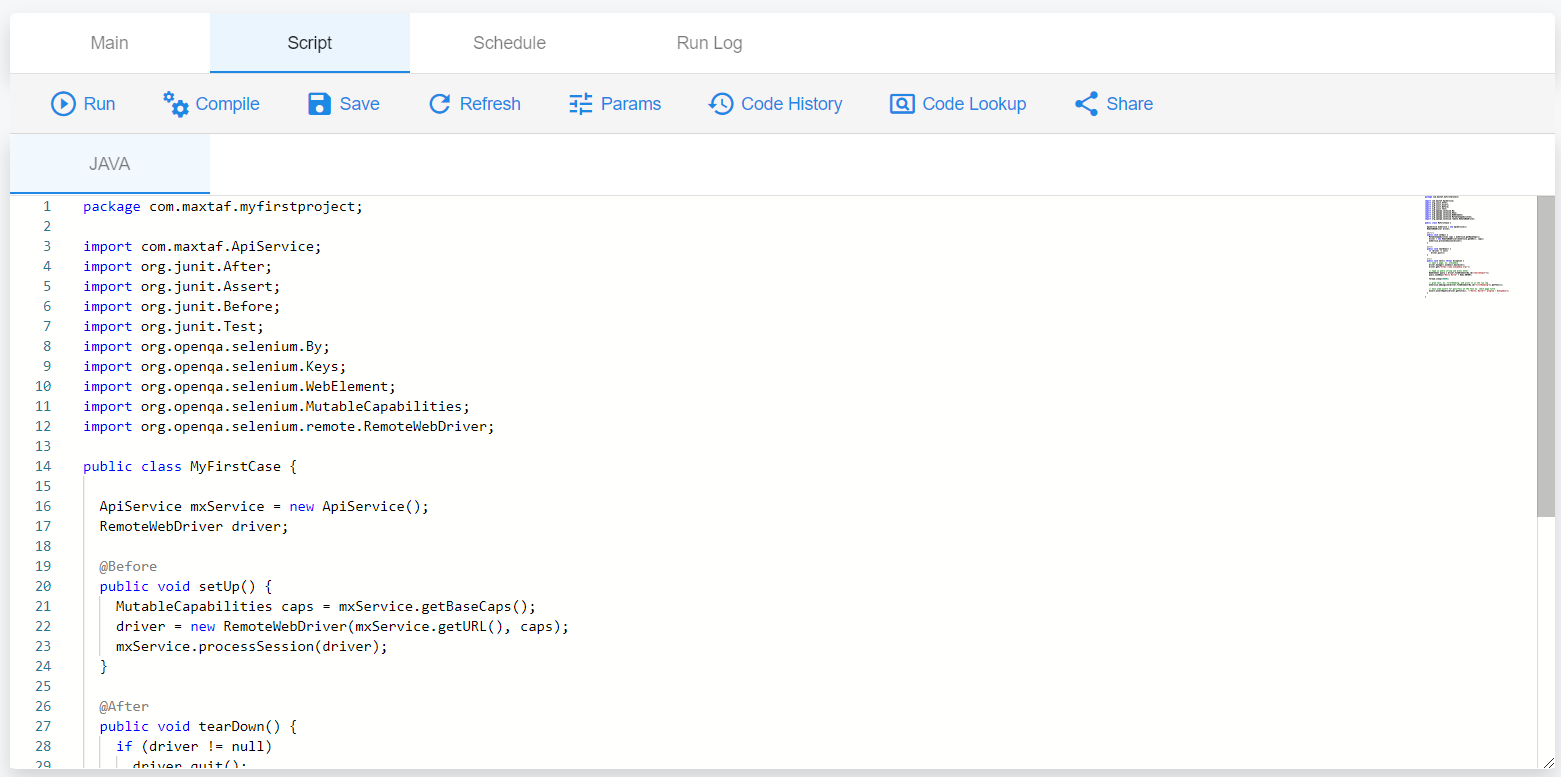
Feel free to edit this in any way you wish. If you need an example, try adding another assert function beneath the one that already exists:
Example Code Snippet:
// assert that the search text box on the result page contains "Hello World"
        Assert.assertEquals(driver.findElement(By.id("firstHeading")).getText(), "\"Hello, World!\" program");
Now you have edited your first case.
The MaxTAF editor works in the same way as any other IDE editor (in fact it’s based on VSCode’s editor, Monaco) so you don’t need to worry about missing any of the core IDE functionality you would usually expect.
Next we will have a look at Suites, the way to group up cases for batch runs.
Suites
Suites are groups of cases (they can also contain other suites). Typically, they are used to organise your cases in a logical manner, such cases of a certain type (e.g UI/API cases) or cases for different areas of your application.
Grouping cases in this way is critical for making the most of MaxTAF Allure reports (see below).
To create a suite you need at least one case. Even though you could technically have a suite with only one case inside it, this feature is usually only used when you have a variety of cases you want to batch up.
For the next exercise, create another case using the method detailed above. We will be adding this case to our first suite.
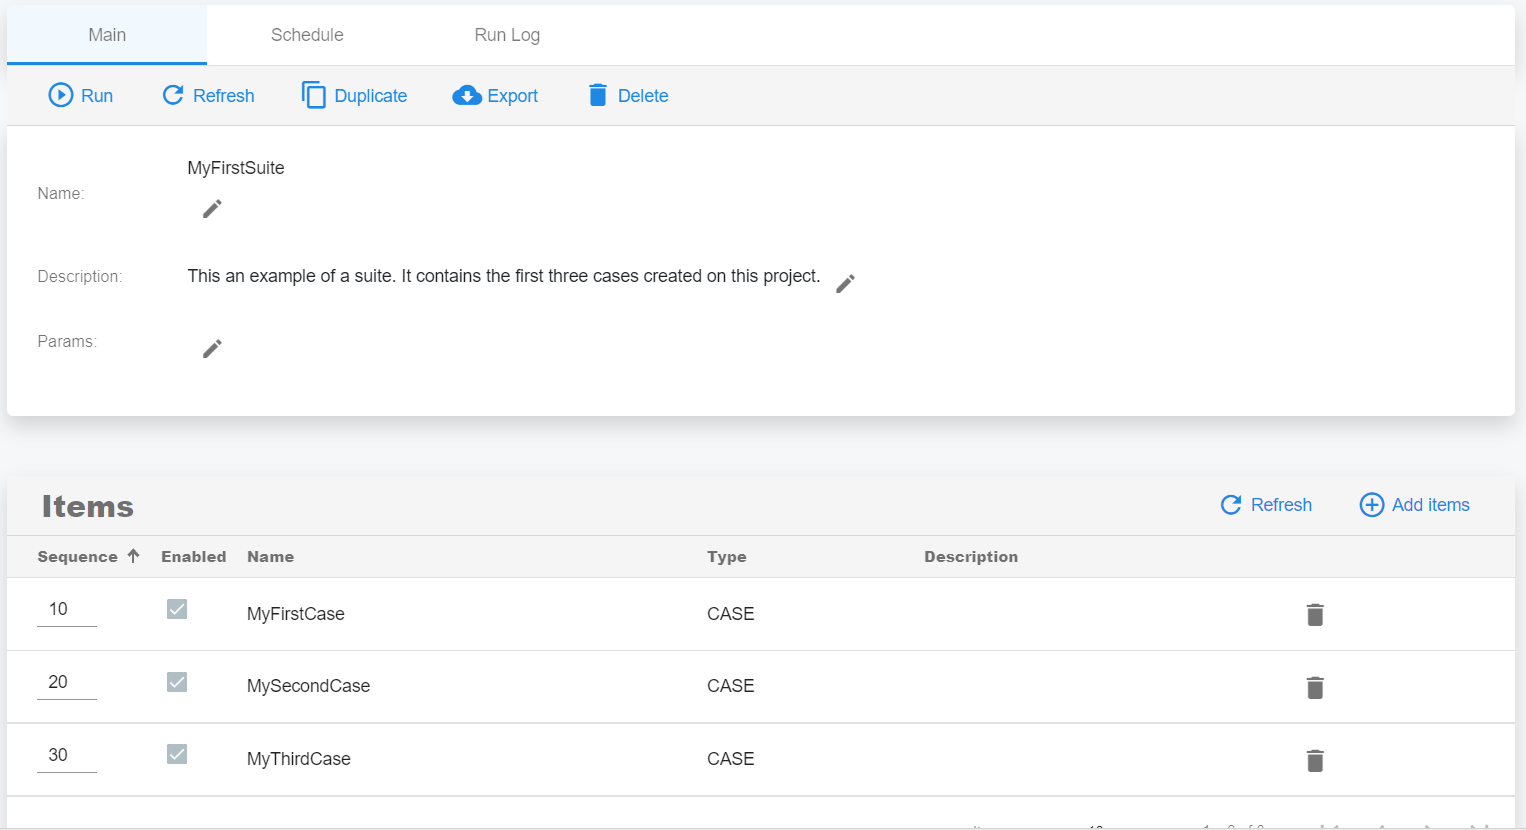
The Suites Section
- Using the navigation menu, go to “Suites”.
- Click Create
- Give the suite a name and click Create.
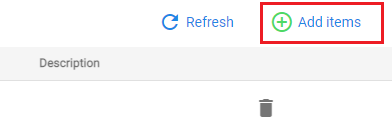
- To populate this suite, scroll down and click ‘add items’.
- From the resulting dialog, add the cases you’ve created.

This is the section of MaxTAF you will administer your suites.
You’ve now created your first suite!

Note: You can also add a case to a suite from its own case page, you just need to go to the Workspace and select the chosen case. From the following page you can click "Add to suite" and choose the suite you want to add it to.
Now you have a suite that, when run, will execute all of those inner cases, and produce a report at the end of it.
To find out more information on suites, click here.
Running a Suite
To run your suite:
- Navigate to the suites list via the navigation menu.
- Click on the suite you want to run.
- Click ‘Run’.
- Confirm by clicking 'Run' in the advanced dialogue.
You can change the order in which the cases will be run by changing the numbers in the ‘Sequence’ column in the items table. The lower the number, the earlier in the sequence it will run.
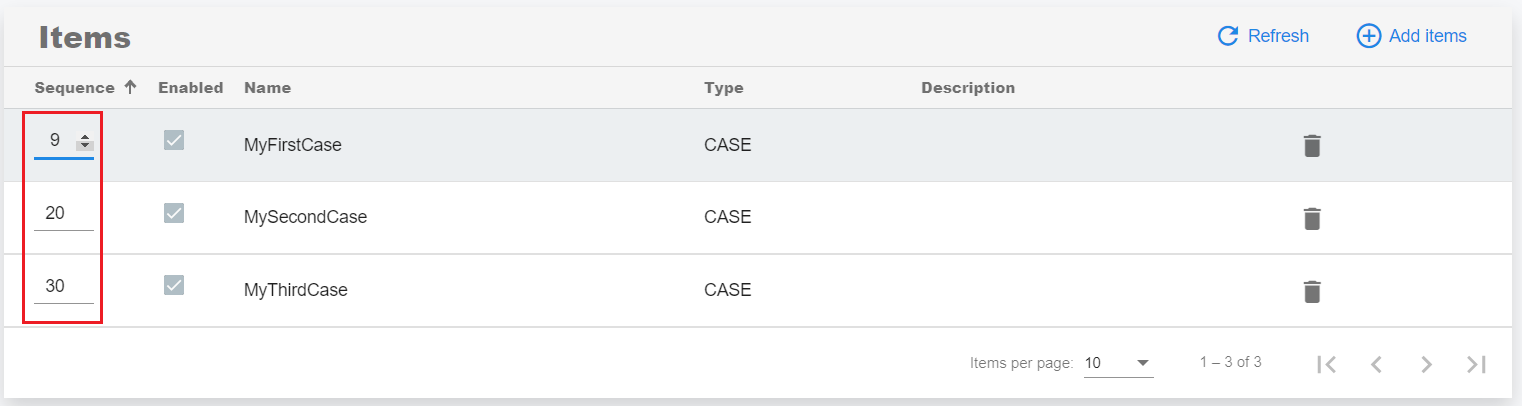
To run all the cases in parallel, set all the sequence numbers to the same number, e.g. 10.
Note: Free users of MaxTAF do not have access to parallel runs. Attempting to exceed the parallel run limit will lead to the exceeding cases being queued. For example, if your project has 2 parallel runs available, then trying to run 5 in parallel will lead to 2 cases being run in parallel and the other 3 cases being queued.
Reports
Running a Suite will automatically produce an Allure report on completion.
Allure Reports
Allure is a powerful open source test reporting framework. To find out more about its intricacies, editability and other details please visit the documentation for Allure here:
https://docs.qameta.io/allure/
To find the report, you will see some options around for ‘Allure Report’. If you press the ‘Allure Report’ Tab, you will open the report in-app. If you press the button to the right of ‘Go to Suite’, the report will open in a popout Tab.
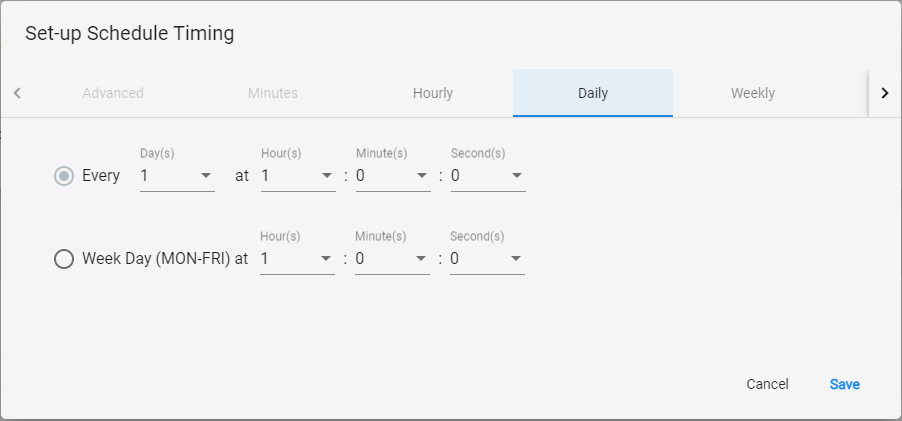
Schedules
Schedules can easily be created.
- Head to the ‘Schedule’ page using the navigation menu.
- Click ‘Create’
- Name it and Select the Case or Suite you wish to Schedule for
- You can also choose a time if you do not want to use the default timing of "every day at 1am" (you can change this later).
- Press ‘Create’
The options here are fairly self-evident.
Read more on schedules here
Finishing Up
This was the basic guide to MaxTAF, covering Account set-up, project/case/suite/schedule creation and other essential details.
Areas that have not been covered, but will become more essential as you progress through your MaxTAF development journey, are:
Workspace
List View
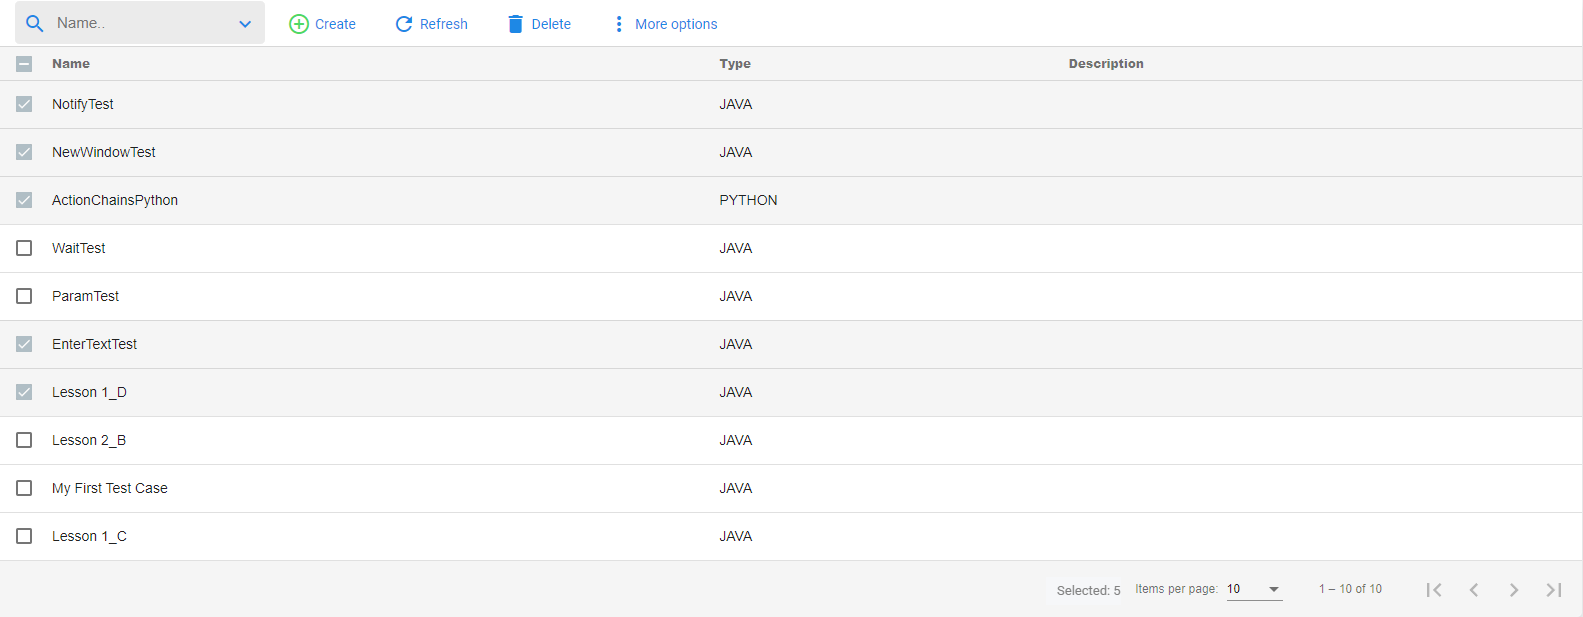
This is the list view for the Workspace, here you will find every cases and page object in this project.
From this page you can create, import, export and delete cases and page objects as well as accessing the bin from which you can restore deleted items.
Creating a Case
To create a Case:
- Using the navigation menu go to Cases.
- Click Create to create a blank case
- Choose a language.
- Choose a testing framework.
- Give the Case a name.
- Select a Template (Selenium 'Hello World' is recommended for those who don't have their own templates).
- Click Create to confirm.
Creating a Page Object
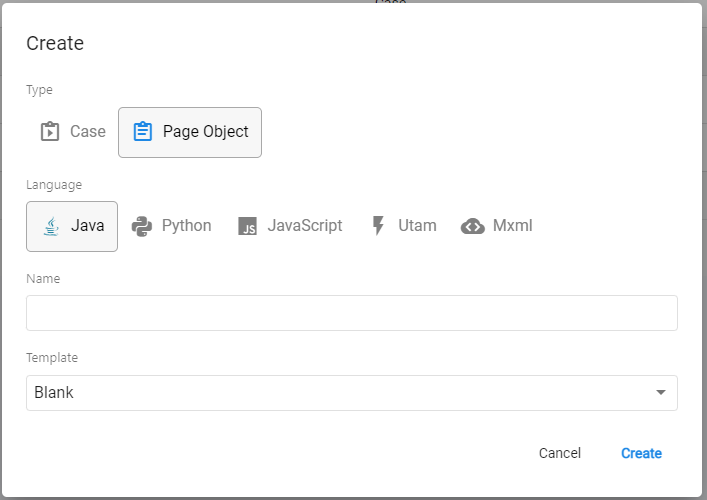
To create a Page Object:
- Using the navigation menu go to Cases.
- Click Create.
- Change the type to Page Object.
- Choose a language.
- Give the Page Object a name and click Create.
- To provide this Page Object with code, go to the script tab and start writing.
Deleting a Selection of Items
To delete multiple items at once:
- Select the checkboxes on the left of each Case or Page Object you want to delete.
- Click Delete and confirm.
Note, the selection is remembered if you move to the next page of results, so you don't need to delete in batches. You can see the current number of selected items near the page navigation buttons at the bottom of the list.
All deleted items will move to the Bin where they can be restored or permanently deleted. If you want to permanently remove an item from your project, you can perform the same select and delete process in the Bin page.
Restoring a Deleted Item
If you delete a Case or Page Object and later want to recover it, navigate to Bin, click on the deleted item and click Restore.
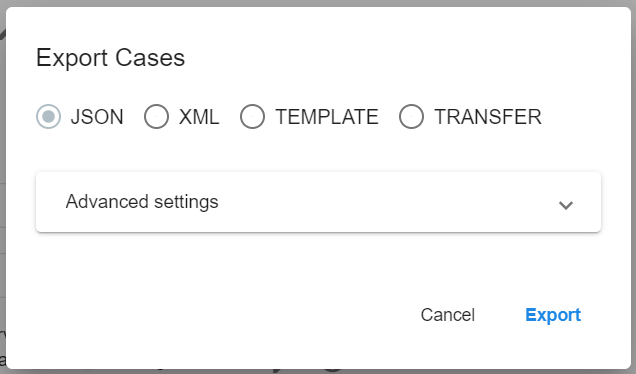
Exporting and Importing Cases
Exporting allows you to download a Case or Page Object in either XML or JSON format. To do so, follow these steps:
- Navigate to the Workspace via the navigation menu.
- Click on the item that you want to export.
- Once on the page for your selected item, click the export button near the top.
- From the following dialog, choose whether you want to export it as an XML or JSON file.
- Press “Export” again to download the export file.
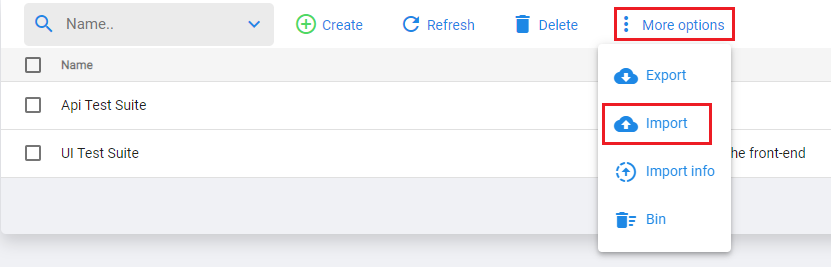
To import an exported item into a project (can be the same project if you have deleted the case since exporting it), follow these steps:
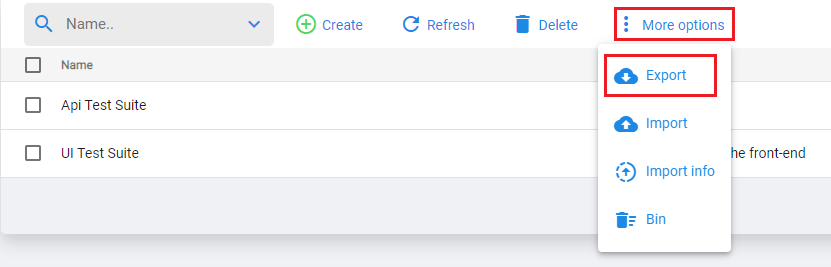
- Navigate to the Workspace via the navigation menu.
- Click More options.
- Click Import.
- Use the Browse function to find the exported case file.
- Without changing the selected check box (the right one is chosen automatically) click Upload

Note: This is the same process for exporting and importing Suites.
When importing multiple cases from one export file (instructions for exporting multiple cases found here), if you received any errors you can check them with Import Info.
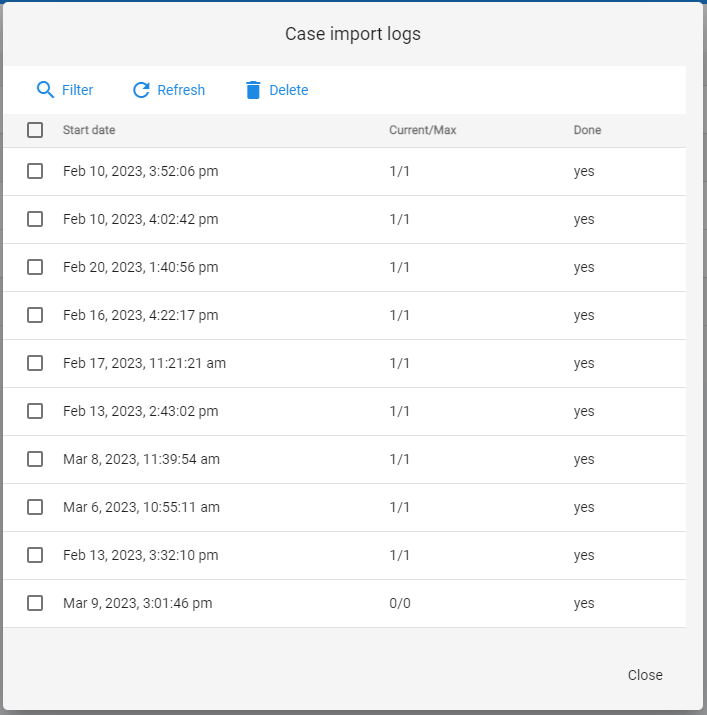
Import Info is very similar both visually and functionally to Compile logs in that it contains a list of entries, named after the date and time the import action was performed. Each entry, when clicked will show the full list of import errors that occurred for each case that failed to be imported.

To find the Import info list:
- From the Workspace list tab click More options.
- Click Import Info.
- From the resulting dialog, click on the desired import attempt you want to inspect.
Templates
What are templates in MaxTAF Cloud?
Templates are used to create Cases and Page Object with predefined code and parameters. Each Case or Page Object in MaxTAF Cloud is created from a template. You can choose from many predefined templates in your project to create one.
Note: Page object models are bespoke to each application, so you will only have the "blank" template available for Page Objects upon project creation. You need create your own templates as you go along if you want to make use of this feature.
Each template is a JSON object which contains the following information:
- Description
- Parameters (Cases only)
- Script code
- Language
- Testing framework
- Template description (how it is described in the Case/Page Object creation dialog).
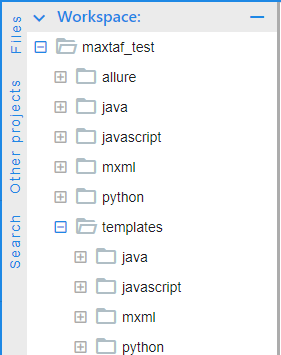
Where are templates stored?
Templates are stored on your project's file system. You can find them by going to the file system via the navigation menu and opening the "templates" folder.
How can I create my own templates?
To find instructions on how to create your own template, click here.
Can I use my templates in other projects?
Yes you can. Just download the templates you want to use and upload them in the corresponding file system folders within the projects you want to use them in.
Selecting Multiple Items for Compiling, Deleting or Exporting
To compile multiple Cases or Page Objects at once, check the box in the first column for each desired Case's row. Going across multiple pages will preserve the selection from previous pages, so you don't need to increase the number displayed per page.
To simultaneously compile multiple Cases or Page Objects:
- Select the desired case
- Click More options.
- Click Compile.
- Confirm the compilation in the following dialog.
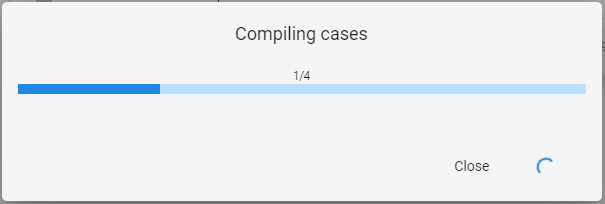
To check for errors that occurred while attempting to compile multiple items at once, use the Compile logs found under More options.

From this list you can select the compile log for the date and time at which you compiled the items. The resulting dialog will show any compilation errors that occurred during the group compile.
To simultaneously delete multiple cases:
- Select the desired cases. If you do not select any, you will delete all cases that match the current filter (If there is no filter then all cases in the project will be deleted).
- Click Delete.
- Confirm the deletion in the following dialog.
To simultaneously export multiple cases:
- Select the desired cases. If you do not select any, you will delete all cases that match the current filter (If there is no filter then all cases will be exported).
- Click More options.
- Click Export.
- Confirm Export in the following dialog.
This will download the selected Cases as one file. If you import this as you would any other case export file (instructions found here), each Case that was selected for the export will be imported as a group.
Case Page
When you click on a case in the case list you will be directed to this page, here you can run, duplicate, export and delete cases as well as viewing and editing any details you see on the page.
You can also access the schedule and run log tabs from which you can create a schedule or view runs respectively for this case.
The tab you will be spending most of your time in is the script tab as this is where the code for your case is stored.
Running a case
To run a case press the 'Run' button from either the script tab or the main tab when you are in the case's page.
You can also Run a case directly from the file system - See information here
Advanced Runs Dialog
When you run a case, you will be presented with the option to run the case using advanced settings.
If you expand the "Advanced" drop down from this dialog you will see 4 options:
- Performance - From here you can create a multi-run for your case or suite by providing the number of times you want to run the case and whether it will run in serial or parallel.
- Params - This option lets you provide extra parameters that will be used for this specific run of the case. You can choose how these parameters will interact with the case:
- Use as priority params - If there is a conflict between these parameters and those set on the case level, use the ones set in the run dialog.
- Use only these params - Use exclusively these parameters and ignore those set on the rest of the system.
- Use as case params - Use these parameters while ignoring all parameters set on the case level. This means that if there is a conflict with parameters on a layer with higher priority than the case layer, use the higher priority parameter. By default, (without changing the parameter "mx.params.source") only the run parameters that conflict with those set on the user layer will be ignored.
- Data driven - Here you can set a file to be used for data driven testing and choose whether to run the cases created from the rows of data in the file in parallel or serial. You can read more about data driven testing here.
- Api Requests - provides the code necessary to run the case from your command line
Note: You are limited by your license when it comes to parallel runs and if you exceed this limit, any extra runs will be added to a queue.
Running Cases in Parallel or in Sequence
MaxTAF handles parallel case runs as a basic feature.

Note: You may be limited by your plan on the number of parallel nodes you can deploy. If you exceed the number of nodes you have available, MaxTAF will use the maximum number available and sequentially run through your runs in batches.
To run an individual case multiple times in parallel, you must:
- Press Run from your case’s page
- Select the ‘Advanced’ dropdown menu
- Select the ‘Performance’ dropdown menu
- Set the ‘Run type’ option to ‘Parallel’
- Choose the number of parallel runs you want
- Click 'run' to confirm
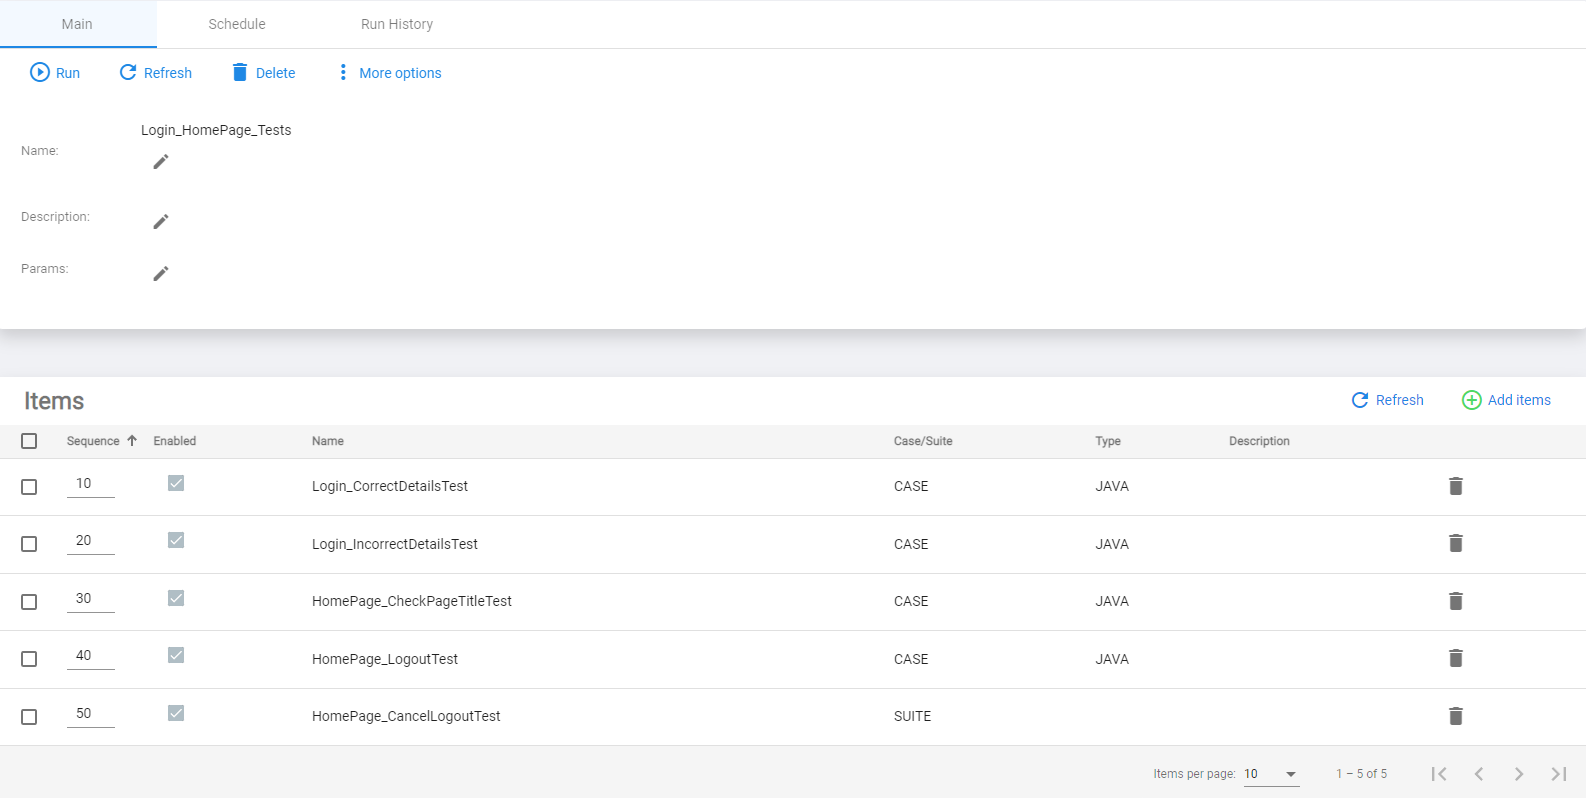
Cases within suites can be run in parallel using the following steps.
Steps:
- Navigate to the chosen suite via the suites list.
- Find the box labelled ‘Items’.
- The Sequence column dictates the run order of the suite.
- When 2 or more items are set to the same sequence number they will run in parallel
- You can also set some cases to run in parallel and some in sequence, for maximum control over your run order.
Data Driven Case Run
If your case is set up for Data Driven Testing See here, follow the above steps but instead of performance select data driven.
- Click the run button from within your case.
- From the following dialog, open the advanced options.
- Open the "Data driven" menu.
- Using the file input, choose the data driven file to run the case with.
- (Optional) Change the run type to choose if you are running the cases in parallel or serial.
You can change the run type to Parallel and your data driven case will run in parallel for as many nodes as there are available.
Basic Run
Just press run again if you want to run the case without any additional settings.
Live Video and Video Recording
When you run a case, after a couple of seconds of execution you will see a live video appear in the run details. This will show you exactly what the browser looks like as the case is executed. Unlike the video recording, this does not require a parameter in order to be displayed.
At any point in the case's execution, the user is able to take control of the run by clicking on the mouse icon in the Live Video window. They will be able to remotely send commands to the computer as if it was their own. The case will still attempt to finish its execution while this is happening so it is a best practice to add a pause or a wait to your case script if you want maximum ease when controlling.
If the user provides to the case the parameter mx.selenium.enable_video_recording=true, after the execution completes, a video will be offered showing the full case execution as a video. This is useful for debugging as it allows you to see the events directly leading to a case failure.
This feature is also useful for analysing cases that finish executing in the time it takes for the live video to load.
Case Parameters
Parameters are named values that are read and usually used by the case when it is executed. They can be set on multiple levels (Suite, User, Project, Schedule parameters) but most of the time you will be configuring them on the case level.

Parameters are either custom parameters set by the user where the name is optional based on what the user wants. The other kind of parameters are reservered parameters.
Standard Case Parameters
Standard parameters are parameters which serve a specific function set by the platform and cannot be renamed but the value can be changed.
The most common parameter is mx.selenium.server which tells the case where the server that will be executing the case is found. This is found in every single case and without it your case cannot run.
All standard parameters have the prefix "mx".
You can read more about standard parameters here.
Examples of Useful Standard Parameters for Cases
- mx.selenium.enable_video_recording - allows a video to be seen after the case is finished executing. Very useful for debugging.
- mx.getProjectParam("PARAM_NAME") - retrieves a project parameter with the name being the same as that contained in the quote marks.
- mx.run.case.repeat_on_failure - causes the case to repeat the specified number of times after a failure until it succeeds. Very useful for cases that are flaky but still valid because they provide useful information.
Custom Case Parameters
Custom parameters are parameters where both the name and value can be set by the user. This is useful for situations where you will want to retrieve a specific value in multiple areas of your case script. Using these parameters will reduce the burden of changing this specific value in future as it reduces the number of areas you need to update to 1.
Here is an example of a parameter list with a custom parameter:
mx.selenium.server=${mx.system.common_pool}
colour=red
Retrieving Case Parameter Values
In order to retrieve a parameter for your case run you need to use the command mxService.getParam(paramName); where mxService is an instance of ApiService and ParamName is the name of your case param.
All parameters are retrieved as a String, so if you need to retrieve a number in order to do something with mathematics for example, you will need to use java commands to parse the string.
Example:
String colour = mxService.getParam("colour");
System.out.println("This colour is " + colour);
In this example we assign a parameter named colour's value to a String variable and print it to the console.
Project Parameters as Case Parameter Values
To set the value of a case parameter to be equal to that of a project parameter, you need to point to it using a dollar sign and curly braces like this:
myCaseParameter=${mx.project.myProjectParam}
As you can see, if it is a custom parameter you are pointing to, you need to add the prefix mx.project before the value.
Sharing a Case
There are 2 ways of sharing your cases in MaxTAF Cloud. They can be found by accessing the page for a case and clicking "share". From the following dialog you can select either "Share example for viewing" or "Share example for editing". Both of these options require the project to be set to public if you want to share with people who are not users on your project.
To find more information on making a project public, click here.
Viewing Option
If you select to share as a viewing link, the URL generated at the bottom of the dialog will send users to the case your project as a guest, most options other than running cases and viewing their details will be disabled for the user.
They will be able to click "edit" on the case which will take them to a page where they can either sign in to an existing account or create a new one. After signing in with either option, MaxTAF Cloud will create a new public project for them and automatically transfer a copy of the case they chose to edit into their own project.
Editing Option
The hyperlink generated in the share dialog when the "Share example for editing" option is selected will take the user passed the screen where they can see your project and its cases. It will navigate them directly to the sign-in/create account page (if the user is already signed in, it will either automatically transfer the copied case into their project, or if they have more than one project, it will ask them which project they want to transfer the case to.
Duplicating Items
To duplicate a Case or Page Object:
- Using the navigation menu, go to the Workspace.
- Click on the Case or Page Object you want to duplicate.
- Confirm the duplication.

This will create a duplicate of the Item except the name of the duplication will have a number appended to the end based on the number of duplications made from this case, starting at 1.
Script Tab
The script belonging to a Case or Page Object can be seen and edited in the 'Script tab' (This is found in the item's Case/Page Object page).
Editing Script Code
We will now go through how to edit a Case or Page Object's code from the script tab.
- Navigate to the Workspace list tab and choose the case you want to edit the script of.
- Click on the Script tab.
- If using a Case, click Run (Hotkey Tip: Press Alt-r to run), and can check to see if your code has compiled correctly and runs. Running cases will save and compile the code first just as compile will automatically save too.
This will present you with an editor, which contains the lines of code used by the script.
Edit this in any way you wish.
The MaxTAF editor works in the same way as any other IDE editor (in fact it’s based on VSCode’s editor, Monaco) so you don’t need to worry about missing any core IDE functionality when writing code.
Creating Templates
You can create as many templates as you wish by exporting specific Cases or Page Objects as templates.
- Create a new item in the Workspace list tab (or choose an existing one) with the same combination of language and testing framework as you want your template to be.
- Then change code and parameters (if writing a Case template) according to your needs.
- When your case is ready to become a template, click the Export button from the case page.
- From the Export dialog, select the Template option, give your new template a name and a description (the description is optional) and click Export.

Now whenever you create a new Case or Page Object, you will be able to select your new template from the template dropdown menu in the creation dialog. This will create an identical Case or Page Object to the one you used to create this template, including both the code and the parameters it uses.
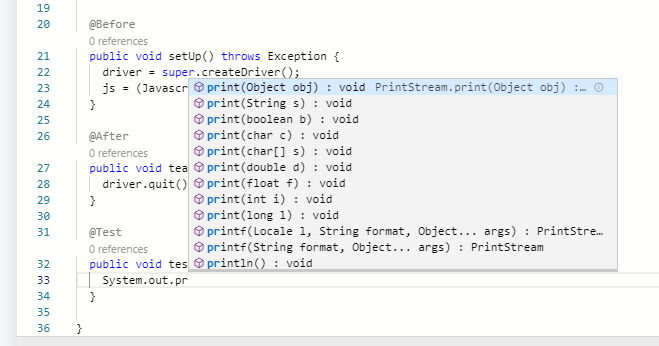
Code Completion
MaxTAF's editor has a code completion feature that is very useful for quickly developing code. The autocomplete feature works out of the box as long as the language server status is enabled (green circle on the bottom right of the editor).

In order to see the code completion in action, start typing code in the script tab for a Case or Page Object, and you should get suggestions as you type.
Code History
Code history is a feature available in the script tab of each Case (and Page Object) in MaxTAF. This button allows a user to view previous versions of the script. From the code history dialog, you can either revert to one of these previous versions or just view and copy segments of code from them.
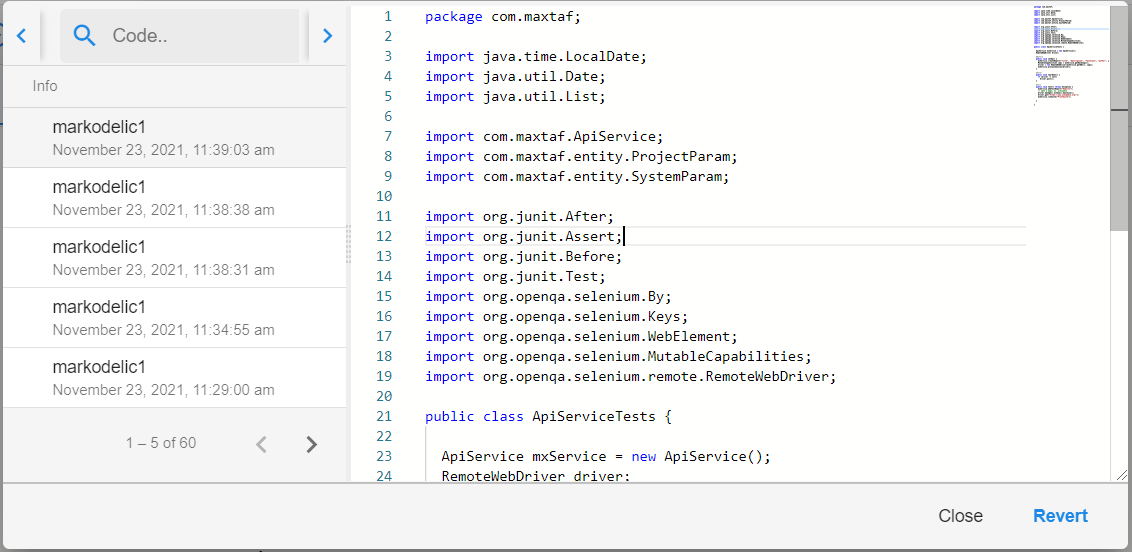
This feature is very useful for two reasons, firstly it acts as a backup in case you break your case beyond the point where it can be repaired. Secondly, if you removed a feature that you now see as being useful again, you can just copy that segment of code from an old version of the case.
The Code History button is found in the script tab of a case in the toolbar
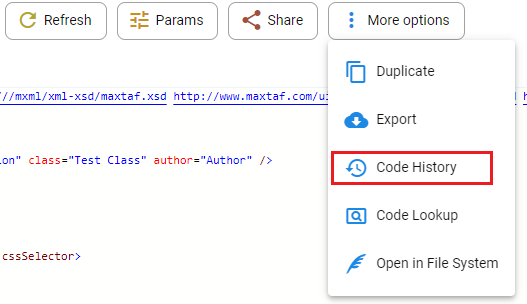
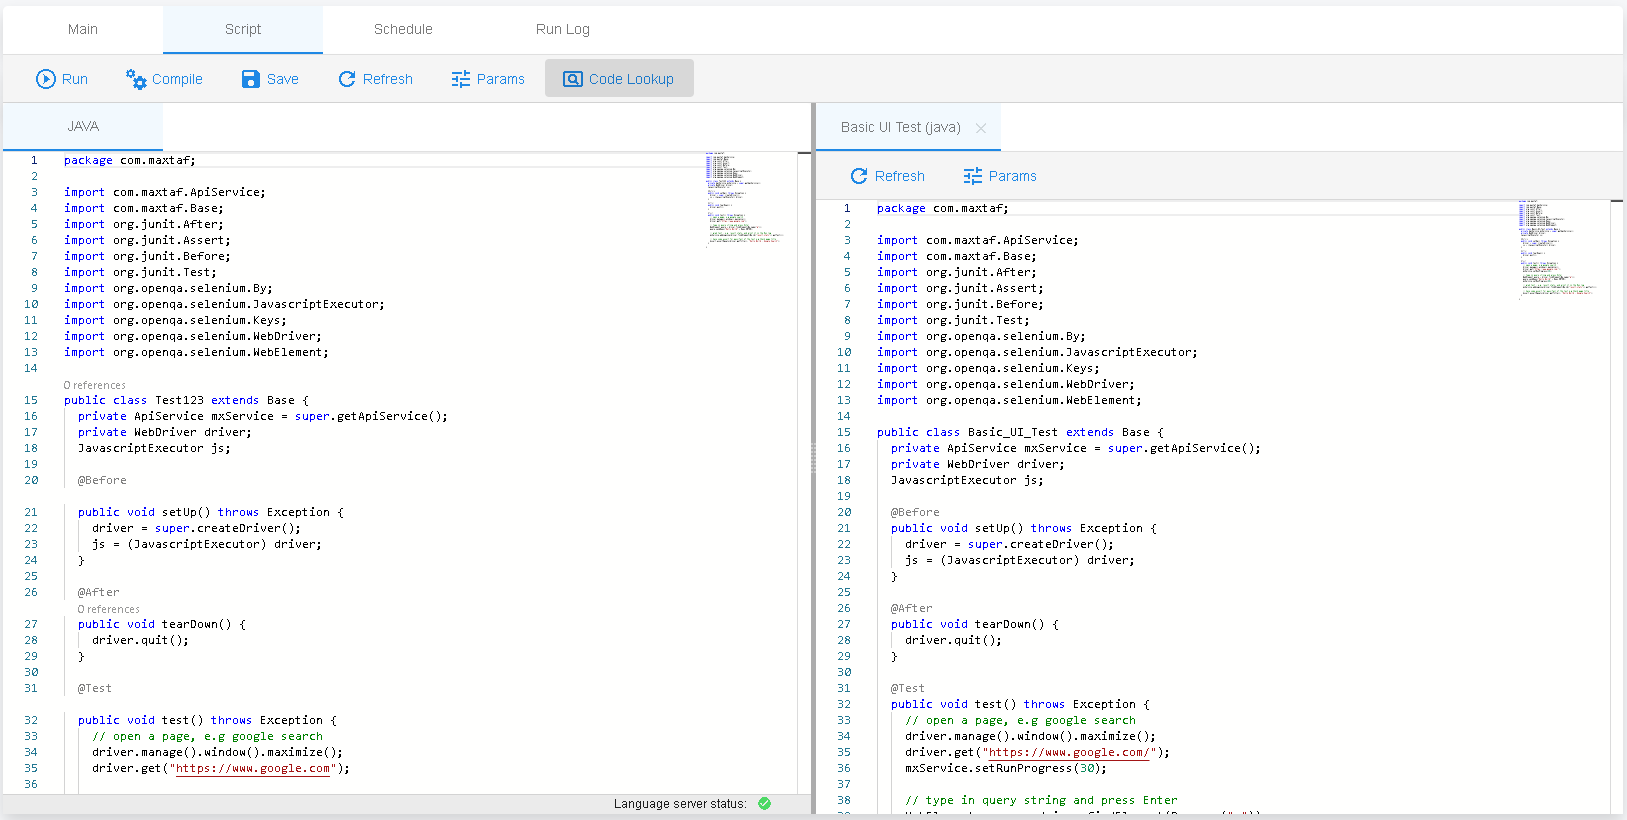
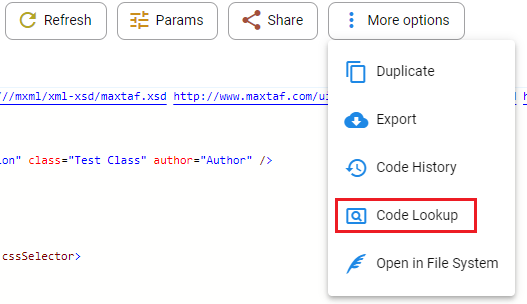
Code Lookup
Code Lookup is an innovative feature that allows users to have an example script opened alongside a script in development.
This is especially useful for referencing and reusing code, a critical part of efficient Software Development In Testing.
Pressing the Code Look-up button will allow you to use find and bring up any other script, from any of the projects you are a part of, to reference.
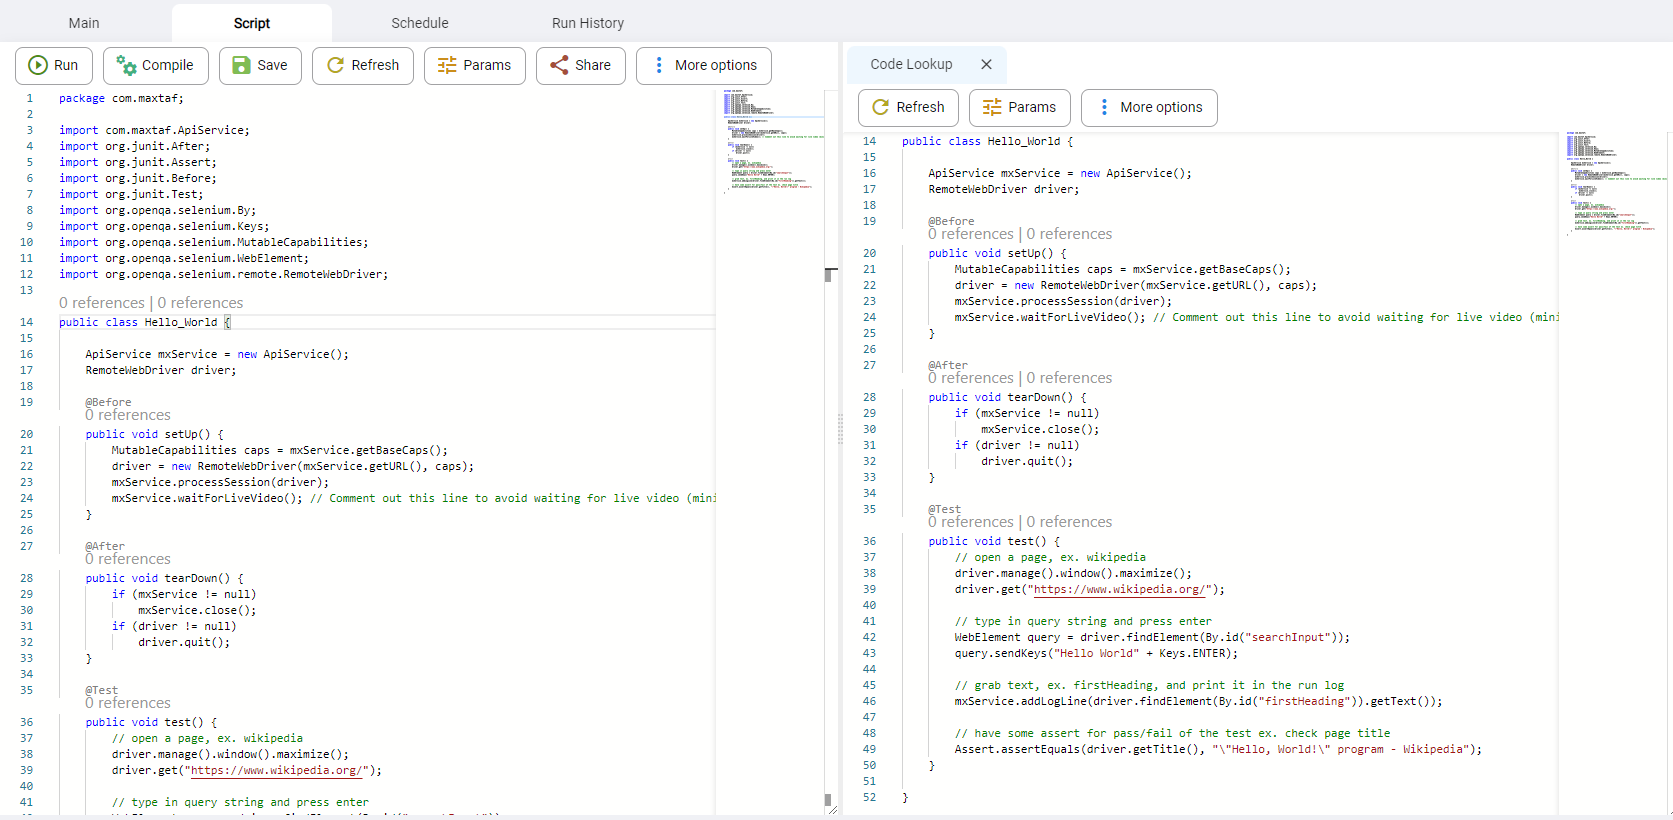
Code Snippets can be copied and pasted from Code Lookup views over to your main script.
The Code Lookup button is found in the script tab of a case in the toolbar
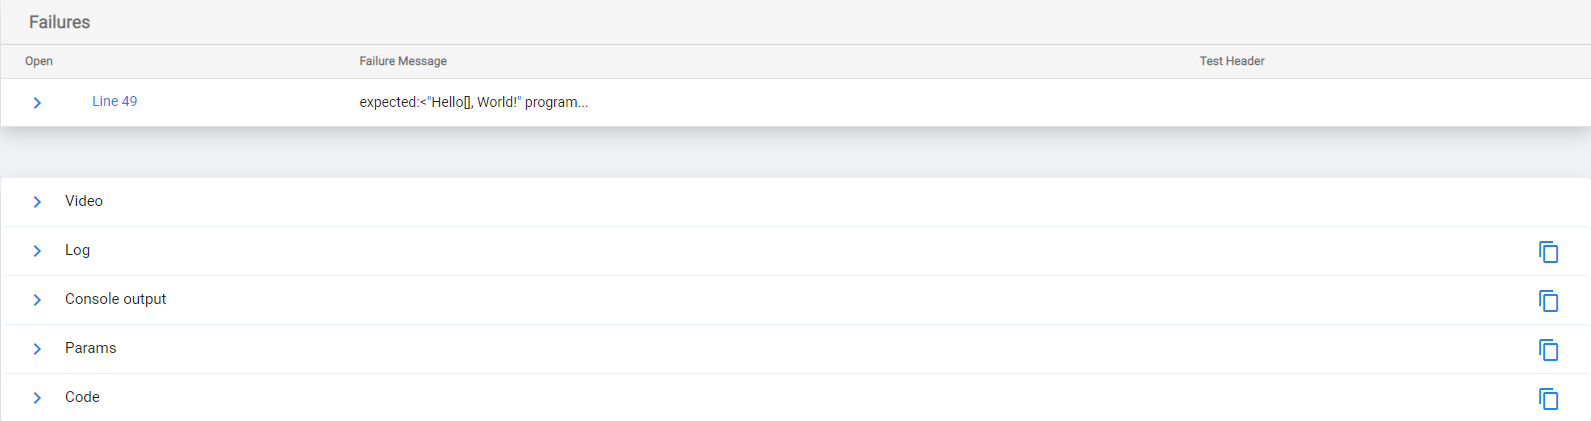
Failure line jump
Failure line jump is a useful feature when writing cases, it allows you to jump to and highlight the exact line of code which produces some error. To do so, you just need to click on the line number in the error message as shown below.

Code Formatting
As you type code for a case, you are prone to making visual mistakes (like indentation, new lines, etc). The Language server comes with a formatting tool which you can use to format your code.
In order to format your code, either right click somewhere inside the code editor then click on “Format Document”, and the code will format itself. The hotkey for this command is system dependant, you can see what keys to press in the same context menu.

Schedule Tab
From this tab you can create a schedule to run this case with a preset frequency.

We cover scheduling in more detail here.
Languages Supported by MaxTAF
MaxTAF Cloud currently supports 4 different programming languages for Cases:
- Java
- Python
- Javascript
- MXML
MXML is MaxTAF Cloud’s custom language that uses XML tags and makes it easier for the person who is not a developer to actually write code. MXML transpiles into Java code which is then compiled. You can read in depth about MXML in the MXML section of the developers guide.
Java is a standard language for writing cases. You can also use custom .jar or third party libraries within your case.
Python is minimal and doesn’t have the need for compilation. It also supports custom or third party libraries.
Javascript is somewhere between Java/Python and also doesn’t need to be compiled.
Page Objects also have UTAM as a language option, this is an automation framework that uses JSON to model pages. When a UTAM file is compiled, 2 Page Objects are generated, one in Java and the other in JavaScript. You can use these page objects in cases that match their respective language.
You can read more about UTAM here.
Page Object Page
As it is with Cases, each Page Object has its own dedicated page containing all of its details.

Here you can perform certain actions:
- Compile - Page Objects can be compiled if their language is compileable, currently, this only applies to Java, MXML and UTAM.
- Refresh - Refreshes the information in the case including "Main" tab details and the script (Helpful when working in groups as this page will not be refreshed automatically if a change is made in another browser window).
- Delete - Moves the Page Object into the Trash records list (accessible from the Page Object list). Read more on Page Object deletion here.
- Open in workspace - Just like it is with cases, each Page Object has a java file that can be found in the Workspace.
- Share - Page Objects can be shared for the purposes of either viewing or editing the file. Click here for details.
- Duplicate - Creates a duplicate of the Page Object in the Page Object list. This feature is frequently used to test changes without losing any current code.
- Export - Exports the Page Object as a downloaded file which can be imported into a project. This is useful for backing up and sharing data. From the Export dialog, if transfer is selected, the Page Object can be directly transferred to a different project. (Importing and exporting Page Objects requires the exact same process as it does with cases and suites, click here to learn more about it).
Once created, you can use this Page Object in your test cases and even in other Page Objects. In this example the test uses the searchCountry() and getTitle() methods belonging to the 2 Page Objects.
public void test() {

    ...

    String oldTitle = homePage.getTitle();

    CountryPage francePage = homePage.searchCountry("France");

    ...

}
In the following example you can see that the HomePage Page Object class also uses the CountryPage Page Object class.
public class HomePage {

    ...

    public CountryPage searchCountry(String countryName) {
        driver.findElement(By.id("searchInput")).sendKeys(countryName + Keys.ENTER);
        return new CountryPage(driver);
    }

    ...

}
File System
The File system gives you access to your project's file structure. From the file system you can:
- View and Edit files
- Create files and folders
- Rename, delete, copy and move files and folders
- Zip and unzip
- Download and upload files
- Add new modules and libraries
- Run Cases
- Compile Cases
- Create Cases from files
You can access the file system from the navigation menu by clicking on the file system menu option:

Warning: As with any other file managing system, be very careful when deleting files/folders as you may cause irreparable damage.
The file system is organized in two panes:
- File tree pane - allows you to view the project structure, add and delete files, select files for editing, zip/unzip, download/upload files etc.
- Editing pane - allows you to view/edit files and perform actions that are specific to the context of the file.
MaxTAF files are organized in a typical hierarchical manner. Within the project root folder there is a dedicated directory for each of the supported languages.
Viewing files from Other Projects
To view files from other projects that are accessible from your account, press the "Other Project" tab in the side menu of the File Tree pane. This will open the other project's files in a split view below the currently opened file tree. This allows you to move, edit or copy files into your current project.
Note: you can view files from other projects and copy them into the current project but you cannot edit them. In order to edit them you must switch to their project.
File Actions
Depending on the type of the file, you may also have some type-specific actions. For example a .java file can be compiled and, if it is also the script file for a case, the case can be run from here. Here is a list of some typical actions:
| Save |  |
Saves changes to the file. |
| Properties |  |
Shows properties of the file. |
| Download |  |
Downloads the file. |
| Compile |  |
Compiles the file. |
| Go to case |  |
Navigates to the case page associated with this case file. |
| Refresh |  |
Refreshes the editor. |
| Run |  |
Runs the case. |
| Params |  |
Reveals the parameters of the case. |
| Transform To Case | Creates a Case from the file. |
File Structure and Libraries
Each of MaxTAF's supported languages have their own dedicated folder within the file system.
Within these folders, each language will have a place where you can add any of the external libraries and modules that you need for your cases and files. To add a library or a module: locate it on the internet, download it to your computer and then upload it to the dedicated folder.
Note: Java uses maven so all you need to do is lookup the maven dependency online and copy the necessary lines of code into your pom.xml file in the "dependencies" block. This removes the need to download the files yourself.
Java File Structure
Java related files are organized in the following folders:
- maven - holds all components available to Java cases, this includes any dependacies you add via pom.xml
- src - holds all source (.java) files, divided into 2 main sections "test" and "main". In addition to the Java files that are created when you create a case, you can create/upload any other class files that you need.
- target - holds the class files generated from compiling, the files generated by certain maven functions as well as information generated by maven when building your files.
- pom.xml - this file sits on the same level as the other 3 folders and stores information required by maven to build your java files.
Python File Structure
- maxtaf - holds some predefined modules and scripts that are required for the communication between your script and MaxTAF framework.
- modules - holds all of your Python modules. If you need to add some more modules, upload them here.
- scripts - holds all of your script files. In addition to the Python files that are created when you create a case, you can create/upload any other Python files that you need.
Javascript File Structure
- maxtaf - holds javascript modules and some files required to run JS cases. This is the place where you can upload any additional modules that you may need.
- scripts - holds all of your script files. In addition to the Javascript files that are created when you create a case, you can create/upload any other Javascript files that you need.
Robot Framework File Structure
Robot Framework is different to other languages in that it sits on top of Python as a layer. For that reason, addition of new libraries requires adding new libraries into the Python file structure.
- scripts - holds all of the source (.robot) files
Adding Libraries and Modules
MaxTAF Cloud fully supports a libraries. You can also use custom or third party libraries (for example from https://mvnrepository.com).
Java
In order to add libraries via maven do the following:
- Look up the library in the Maven Repository.
- Select the correct version and in the following page, under the "Maven" tab, copy the whole block of code displayed there.
- Now go to the file system for your MaxTAF Cloud project.
- Navigate to the Java folder and open "pom.xml"
- Within the tags named "Dependencies" paste the code you copied from the maven repository and save the file.
- You should now be able to use that library in your cases.
In order to add custom jar files:
- Navigate to the file system "java" folder, add a folder where you will keep your custom libraries.
- Upload the chosen jar file to this directory.
- Add the following code to your dependency, but the contents of the systemPath tag with the path to your jar file (path can be found by right-clicking and selecting "properties").
- Save the pom.xml file.
        <dependency>
            <groupId>com.sample</groupId>
            <artifactId>sample</artifactId>
            <version>1.0</version>
            <scope>system</scope>
            <systemPath>${PATH_TO_LIBRARY_FILE}</systemPath>
        </dependency>
Note: if you want to add more than one library you will need to provide a unique artifactId for each one.
Parameters Page
From this page you can administer project parameters. Project parameters can be accessed by any case in the project.
You can read more about using project parameters here.
Creating Project Parameters
To create a project parameter:
- Navigate to the Parameters page via the navigation menu
- Click Create.
- Provide a name (this will be the value you enter to retrieve the parameter in code).
- Provide a value (this will be substituted into the code when the name is retrieved).
- Optionally provide a description of what the parameter does.
- Click Add to confirm the creation.
You should now see the parameter in the list (the list is sorted by name by default so if you don't see it straight away, look in some of the other pages).
Deleting Project Parameters
To delete a parameter from the list, click the bin icon to the right and confirm the deletion in the following dialog.
Editing Project Parameters
To edit the project a project parameter:
- Navigate to the Parameters page via the navigation menu.
- Find the parameter you want to edit, either by filtering or using the paginator in the bottom right.
- Click on the parameter and edit either the description or the value.
- Click Save to confirm.
Currently you cannot edit the name, if you want a differently named parameter, then create a new one and copy in the value and description.
Suites Section
Suites are batches of cases, used for running groups of cases.
They can be used to either run an entire pack of cases, or to batch cases up according to themes, system areas tested, types of case or any other level of refinement required.
Grouping cases in this way allows for more granular reporting, giving testers and developers better and more precise insight into system health.
To get to the suites section: Using the navigation menu on the left of the page, go to “Suites”.
This section of MaxTAF is the place to administer all your suites.
Suites List
This is the suites list, here you will find all the suites created in this project.
From this page you can create, import, export and delete suites as well as accessing the list of deleted suites, from which you can restore any deleted suites.
Creating a Suite
To create a suite:
- Using the navigation menu, go to Suites.
- Click Create.
- Give the suite a name and confirm by clicking Create.
- To populate this suite, scroll down and click Add items.
- Add the cases you’ve created.
You’ve now created your first suite!
Exporting Suites
Exporting allows you to download a suite in either XML or JSON format. To do so, follow these steps:
- Go to Suites via the navigation menu.
- Using the checkboxes select which suites you want to export. Selecting no suites will result in exporting the entire list of suites.
- Click More options, then click Export.
- Within the prompt, you can choose the file extension in which you want to export your suites (you can ignore this unless you have a specific reason not to).
- Click Export to confirm.
Exporting suites will also export the items contained within.
Importing Suites
Importing allows you to upload a previously downloaded suite export file to your project. In order to import suites:
- Go to Suites via the navigation menu.
- Click More options, then click Import.
- Within the prompt, you can use the file input to choose the downloaded export file.
- The dialog will automatically select the correct file type in the options below if it has the right extension.
- Click Upload to confirm.
Importing suites will import the items that were contained them within when they were exported.
Restoring a deleted Suite
If you deleted a suite and want to recover it:
you can do this by navigating to Bin from the suites list, going to the deleted suite and clicking restore.
- Go to the Suites list via the navigation menu.
- Click More options then click Bin.
- From here, select the checkboxes for the suites you want to restore. Selecting none will restore all deleted suites.
- Click Restore and then YES to confirm.
This will take you to the list of deleted suites in your project.
Suite Page
When you click on a suite in the suite list you will be directed to its page. From this page you can perform the following actions:
- Run - read more about running suites here.
- Duplicate - Create an exact duplicate of the current suite, with a number appended to the name (indicating how many duplicates of this suite already exist).
- Export - Exports the current case, read more about exporting here.
- Delete - Deletes the suite by sending it to the Bin. Deleting a suite from the Bin will permanently remove it from your project.
You can also access the schedule and run log tabs from which you can create a schedule or view runs respectively for this suite.
Running a Suite
To run your suite:
- Go the desired suite via the Suites list.
- Click Run.
- In the following dialog click Run to confirm.
Ordering Items in a Suite
Your suite items can be sequenced in any configuration or order that you choose.
In the items table, under the sequence column, the number shows in what sequence each case will run.

If you select the same sequence number for different items in the suite, then those will be run in parallel.
Sharing Data in a Suite Run
Cases can share information during a suite run. This is especially needed when one case creates some data object that will then be further processed by another case that runs after it.
The mechanism that MaxTAF Cloud uses is similar to a bulletin board, in the sense that the cases that participate in the same suite run can post information to and read information from a jointly accessible area.
- To post a piece of information, a case will use ApiService method setSharedRunValue(name, value)
- To read posted information, a case will use ApiService method getSharedRunValue(name)
Even for hierarchically structured suites (when a suite contains other suites), the values that are posted to the bulletin board are available to all cases in all suites that belong to the hierarchy.
Note: It is very important to correctly sequence the cases in the suite as otherwise you may end up reading a shared value before it has been set.
Example:
Suite Structure:
|
Sequence No |
Case |
|
10 |
Create_Invoice |
|
20 |
Approve_Invoice |
Java:
Create_Invoice code:
public class Create_Invoice extends Base {
		private ApiService mxService = super.getApiService();
		@Test
		public void test() {
		mxService.setSharedRunValue("invoice_no", "INV123");
		}
	}
Approve_Invoice code:
	public class Approve_Invoice extends Base {
		private ApiService mxService = super.getApiService();
	...
		@Test
		public void test() {
			String invoice_no = mxService.getSharedRunValue("invoice_no");
_____________________________________________________________
_____________________________________________________________
Python:
Create_Invoice code:

class Create_Invoice(Base):

  def setup_class(self):
    self.mxService = Base.getApiService(Base)

  def testBasepy(self):
    self.mxService.setSharedRunValue("invoice_no","Hello from test!")
Approve_Invoice code:
class Approve_Invoice(Base):

  def setup_class(self):
    self.mxService = Base.getApiService(Base)

  def testBasepy(self):
    invoice_no = self.mxService.getSharedRunValue("invoice_no","Hello from test!")
_____________________________________________________________
JavaScript:
Create_Invoice code:
describe("Create_Invoice", function() {
  let mxService

  before(function() {
    mxService = base.getApiService()
  })

  it("posts invoice no", async function() {
    mxService.setSharedRunValue("invoice_no","INV123")
  })
})
Approve_Invoice code:
describe("Approve_Invoice", function() {
  let mxService

  before(function() {
    mxService = base.getApiService()
  })

  it("reads invoice no", async function() {
    invoice_no = await mxService.getSharedRunValue("invoice_no")
  })
})
Suites of Suites
Suites can be also contain other suites.
To create a suite of suites, follow the same process for adding cases, but when you enter the ‘add items’ dialogue, click the "suites" tab at the top of the dialog and select the desired suite
Suite Parameters
Suite parameters will be applied to internal cases, overriding any conflicting parameters.
Suite parameters do not do anything unless there is an identically named parameter in a contained case.
The guide on parameters can be found here.
Schedule Tab
From this tab you can create a schedule to run this case with a set frequency.
We cover scheduling in more detail here.
Schedules Section
Schedules are items in MaxTAF which run a Suite or Case with a fixed timing.
Schedules List
The Schedules list, contains every schedule belonging to this project. From this page, you can also create schedules. Only one item can be used per schedule so in order to schedule multiple cases, you need to add them all to a suite first.

Steps:
- Navigate to the Schedule section via the navigation menu.
- Click “Create”.
- Give the Schedule a name.
- Select the desired Case or Suite.
- Choose your schedule timing.
Note: you can edit any of these details and more from the schedule's page.
Schedule Page
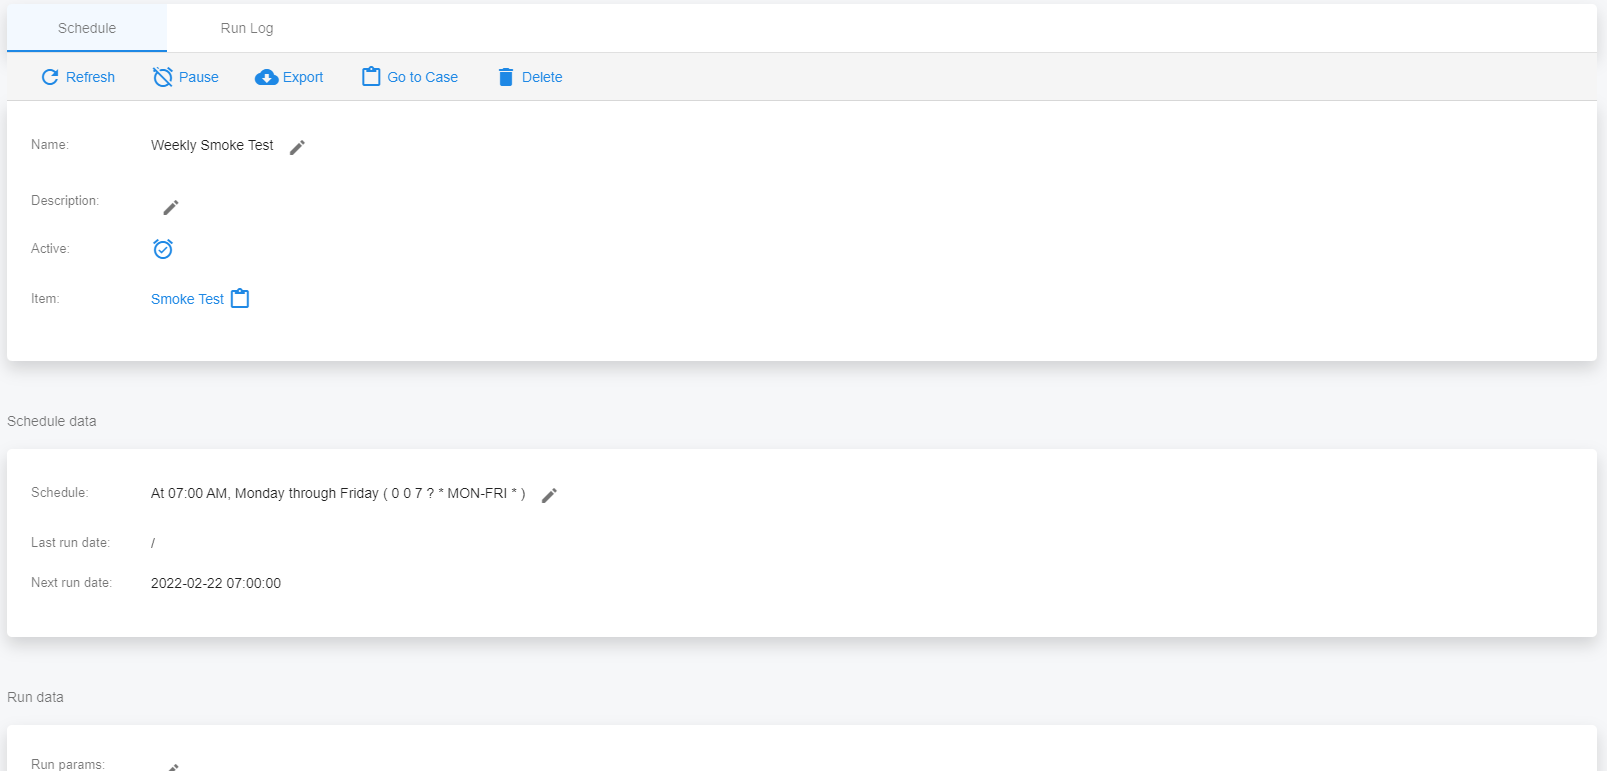
Similar to a case or suite, each schedule has its own page where important details can be found.
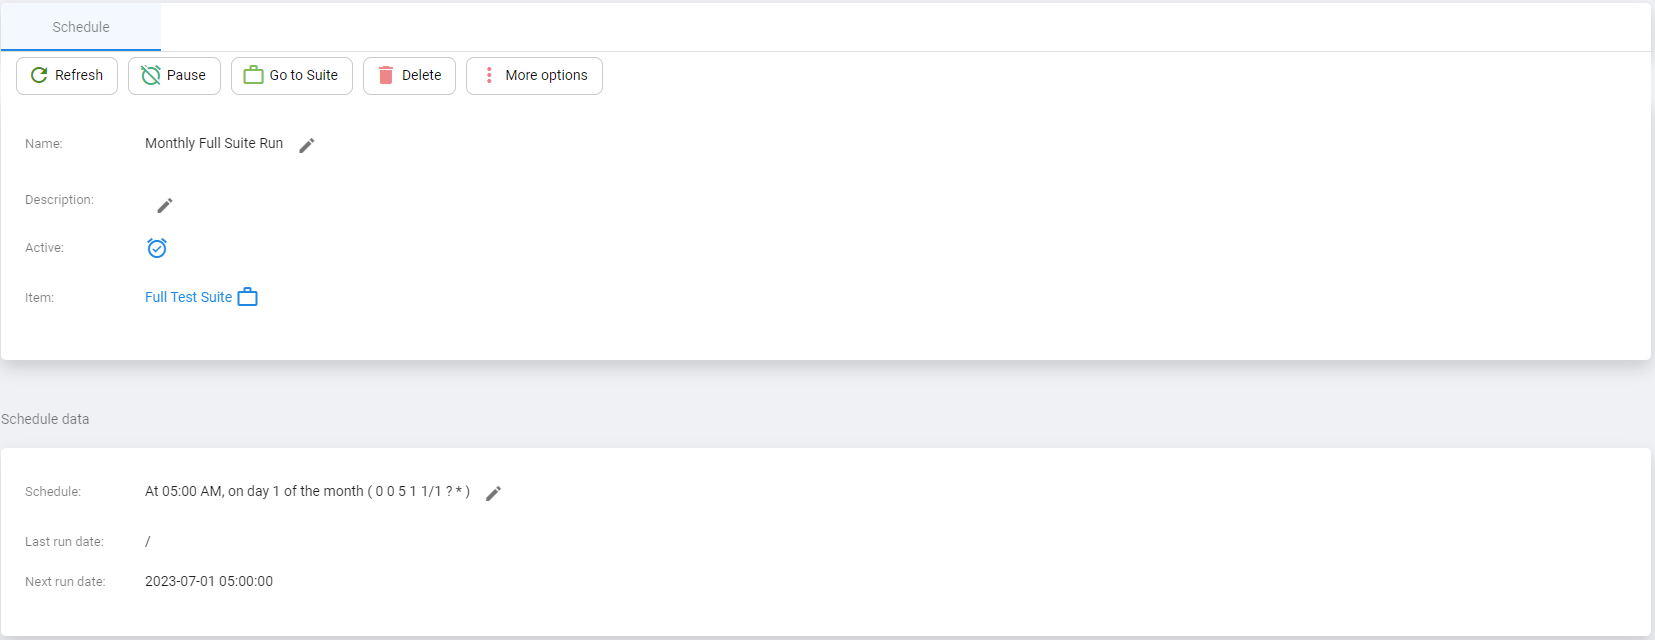
These details are divided into sections, each containing the following:
- Name - Name of Schedule.
- Description - Description of schedule.
- Active - Status of the schedule showing two symbols denoting whether the schedule is paused or active.
- Item - The case or suite belonging to this schedule which will be run when the timing condition is met.
- Schedule - The current timing of the schedule, can be set to either a, minutely, daily, weekly or monthly execution.
- Last and next run date - Shows when the scheduled item was last run and the next time it is going to run.
- Run Params - Here you can provide parameters to the run which will be supplied to the scheduled item when this schedule is triggered. A good parameter to use here is mx.notify which will notify you when the schedule executes. This parameter can be set to only notify on failure.
- Repeat run - How many times you want to run the item contained within when the schedule executes.
- Run Type - whether the schedule runs in serial or parallel.
Main Section
Schedule Data
Run Data
Every field with a pencil icon next to it can be edited.
Actions available to the Schedule Page
From the schedule page you can use the tool bar to do the following:
- Refresh - Refreshes changes made to the schedule, useful when collaborating with a user on another machine.
- Pause/Resume - When paused the schedule will not execute when its timing conditions are met.
- Export - When you export a schedule, it will export the item and, if the item is a suite, it will export the suite's inner items too.
- Go to Case - Navigates you to the case/suite page of the item bound to this schedule.
- Delete - Deletes the schedule (does not delete the items within).
Run Log Tab
From this tab you can see every run that executed using this schedule.
Setting Schedules From a Case or Suite
You can also set schedules from the schedules tab inside individual Suites or cases.

These can be administered from the schedule menu as well.
Runs Section
Whenever a case or suite is run in MaxTAF, a run entry is created. This allows users to see what has been run as well as the items that are currently being run.
Runs List
This is the Runs list, you can view all runs of your project's cases and suites.
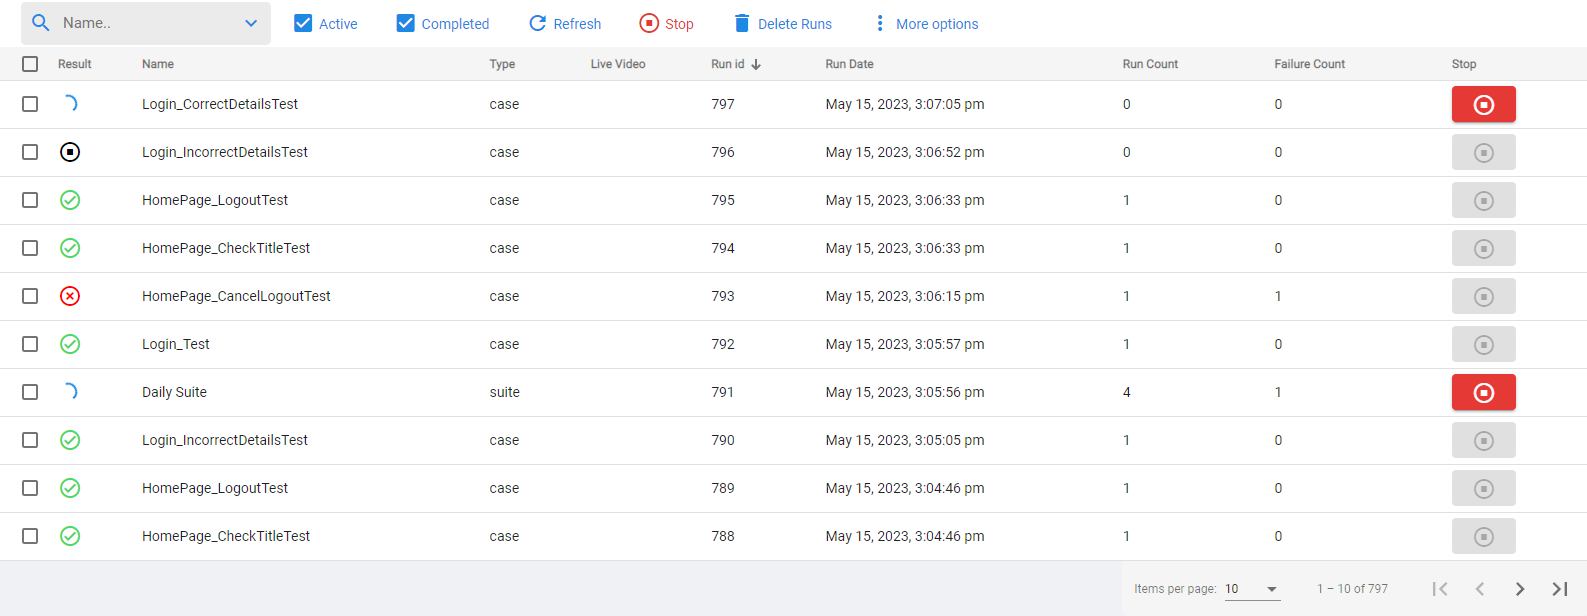
Each run has one of the following statuses:
- Active - these runs are currently being executed, indicated by the progress spinner.
- Success - this run has been successfully executed without errors or failures.
- Failed - this run has finished execution but it encountered an assertion error.
- Broken - this run has finished execution but it encountered a non-assertion error.
- Stopped - this run was stopped manually by a user.
- Queued - this run was expecting set up to run in parallel but has been prevented from doing so by the run limit on this project.
- Waiting - this run is waiting to be executed when the runs before it have finished executing.
- Failed to start - this run encountered an error while trying to start. This is rare, if encountered, please report this to our support email.


Run Page
When you click one of the runs, you will see all the information relating to the execution (whether it has finished or not).
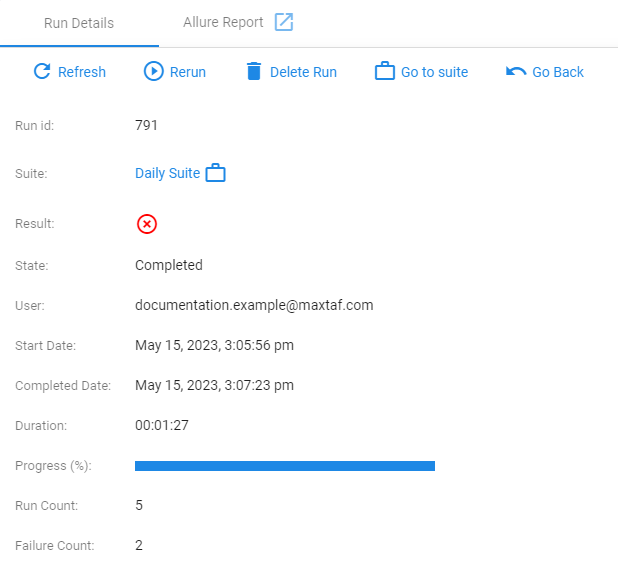
From this page you can perform the following actions:
Run Details
Here is a breakdown of each piece of information shown on this page:
- Run id - The id of this specific run.
- Case/Suite - The current Case or Suite that is being executed.
- Result - The status of the current run.
- State - Whether the current is still being executed or not.
- User - The user that started the run.
- Start Date: The date and time the run started.
- Completed Date: The date and time the run finished (only shown in completed runs).
- Duration: The current duration of the run's execution.
- Progress: A bar showing the percentage of the run's children that have completed (only relevant for multi-runs and suites).
- Run count: the number of child runs spawned by this run that have finished execution (only relevant for multi-runs and suites).
- Failure count: the number of failures encountered during the execution of this run.
Below the information described above you will see something different based on whether it is a case or a suite run:
- For Case runs, there is a dropdown menu showing various details related to your run:
- For Suite runs you will see the child runs that were executed as a result of running the suite. You will also see a dropdown menu containing the parameters that were used to run the suite:
Live Video
The Live video option will only appear on runs of a single Case. It shows you the computer you are running the case against, including any actions the case executes and the visual results of those actions.
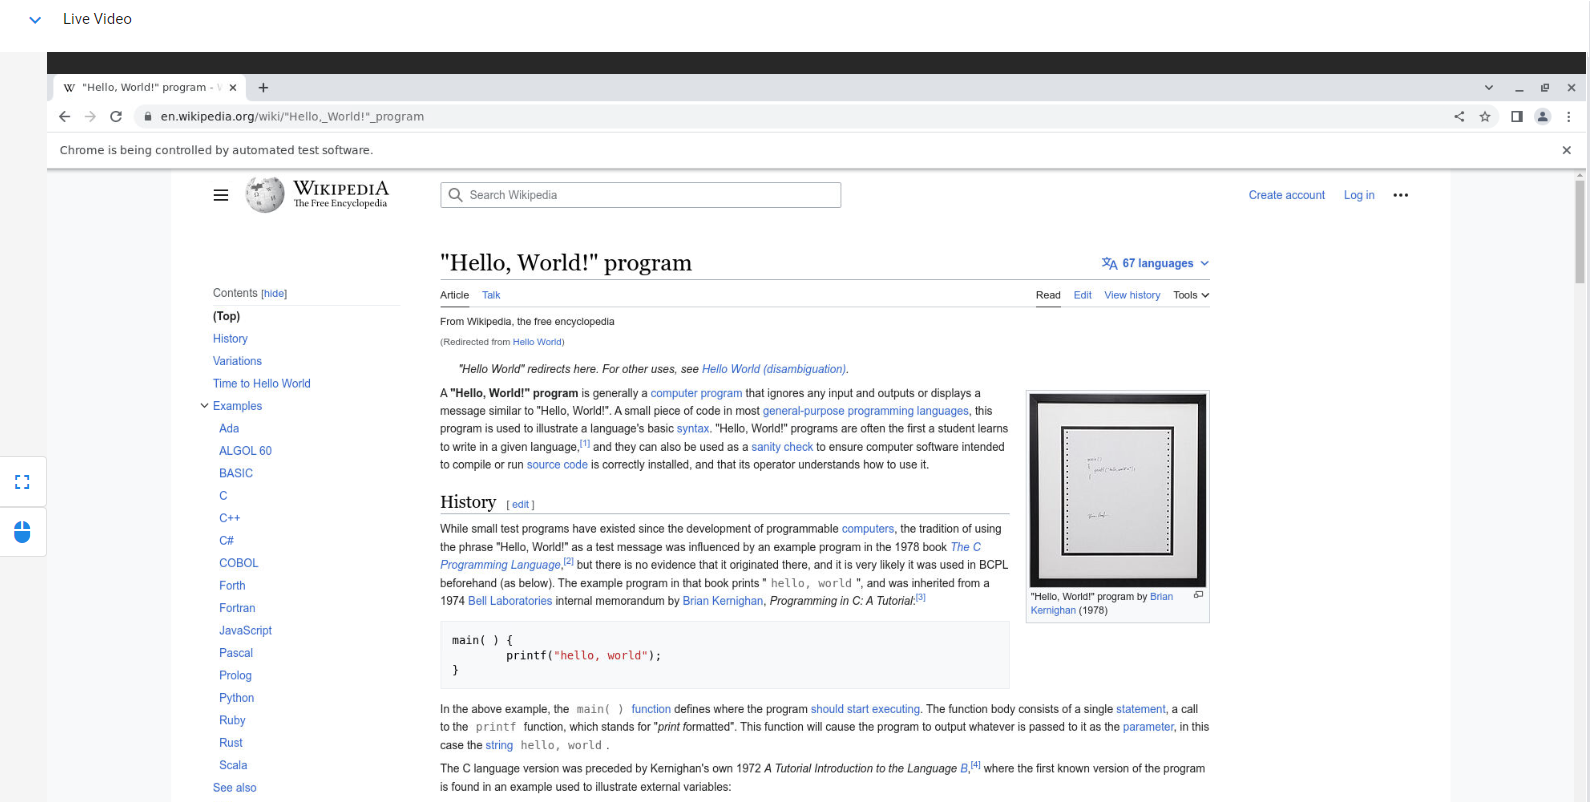
In the left pane in the video you can see a mouse icon:

This allows you to take control of the case's execution midway through the run. This is useful when writing tests as you can inspect elements, temporarily ignore case halting bugs (by clicking passed them), or anything else you might want to see when you are in the position to control the case.
Browser.pause()
The ability to take over runs synergises well with the method Browser.pause(driver, "text") (if using Java) as it allows you to indefinitely pause the case.
If you do not pause the test in this way, the run will continue to try executing the current line of code it is on. This means if that action's conditions are not met by the time it times out, the run will stop.
To unpause the run, press "Continue" in the pause dialog.
The parameters for Browser.pause() are the WebDriver for your case and a String containing text that you want to be displayed in the pause dialog.
Another good use for Browser.pause() is for creating tutorials for using a web app as you can place instructions in dialog box which tell users what to do at each stage of the lesson.
Video Recordings
If the parameter mx.selenium.enable_video_recording=true is provided to the case, the video of the case execution will be saved when the run is complete.
All video recordings for case runs are stored in the file system in the runs folder under the folder with the name equal to the run ID.
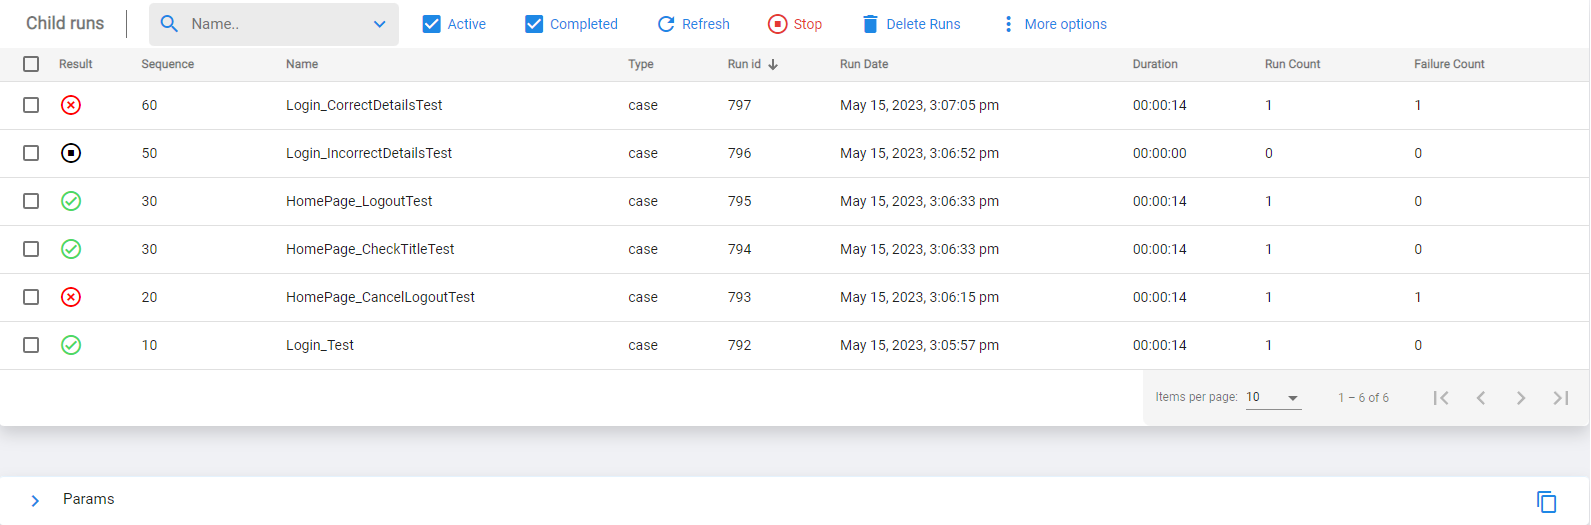
Child Runs
When you create a multi-run (running a suite or the same case multiple times), the run page will show the child runs belonging to said run.
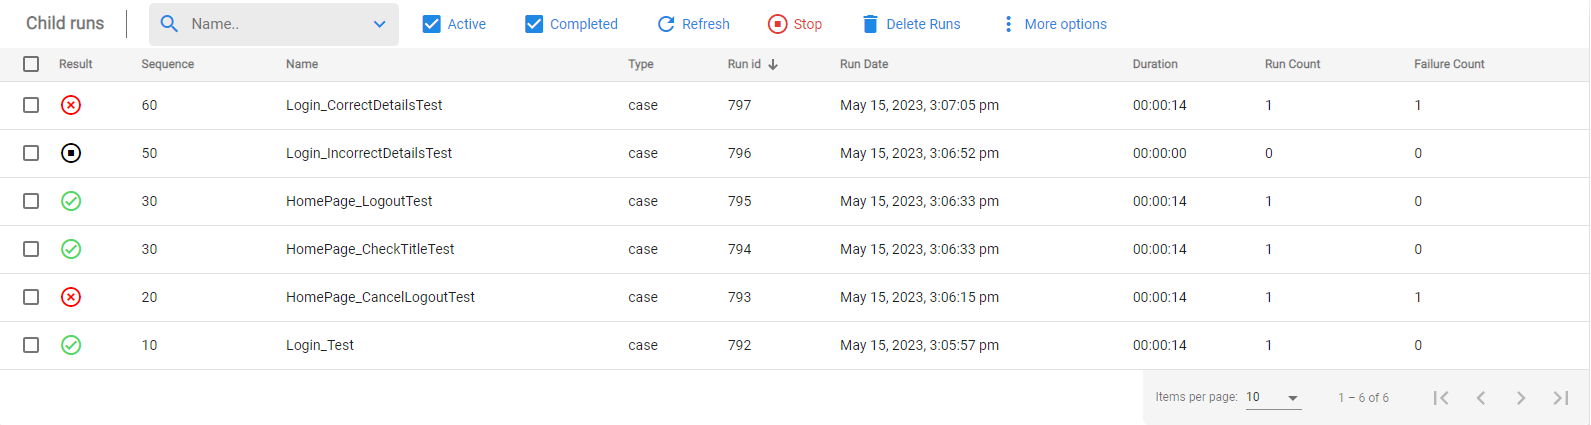
Each of these runs can be clicked to see their own specific run page.
Settings
Project Settings
Projects are administered from the project settings menu, accessed under settings.
Main tab
Here users can see the project name, description and the id by which the project is identified in the database.
Administrators can also set the project to be public from here too, enabling features like sharing case links to anonymous users. They can also restart the MaxTAF engine if needed.
Making your Project Public
To make a project into a public project, click on the checkbox next to "Public project" from the user settings page. The following dialog will ask to enter the project id (found on the same page) to confirm your choice to make it public.
Note that when you make the project public, every case with all the information contained within, will be visible to anyone on MaxTAF Cloud, whether they are assigned to your project or not. Therefore, you need to be very careful that you have not stored any sensitive information on this project before you do this.
Users tab
Multiple Users can be added to a single project, allowing for collaboration in a shared workspace.
In Settings -> Project -> Users, users can be added to the project.
Pressing ‘Add User’ will allow you to add users by email.
Note: Users do not need a MaxTAF account to be added, but must make one if they wish to use MaxTAF.
Users without a MaxTAF Account can be seen in the "Users Requests" tab, while users with MaxTAF accounts will be added to the Users tab automatically.
Users requests Tab
Users who you have added to your project but have not yet created an account appear here.
Configuration Tab
This tab contains configuration parameters, these are specifically related to how the project functions, for example, where it finds necessary libraries for the languages supported by MaxTAF.
If you want to set parameters that will be used in cases, then use the Parameters page.
Check out Documentation on Parameters here
User Settings
Individual Users have a few unique settings that can be set for them.
Properties
You can also administer their ‘Properties’, which is an alternative term for Parameters. Users may run cases with parameters which are unique to them. Check out Documentation on Parameters here.
Setting parameters in this way is useful for users that would want to run the same cases in a different environment to the one the case was specifically created for. E.g. User parameters can specify the url to a QA environment and override the url parameter in a case made for a dev environment.
Parameters
Parameters are a powerful and flexible tool for system configuration in MaxTAF Cloud.
All parameters have a name and a value. For standard parameters, the name is unchangeable as they have a specific use in Maxtaf. For custom parameters, the name and value are chosen by the user and are usually treated by MaxTAF the same way a variable is treated in normal programming.
Standard Parameters
Below is a list of all standard parameters. Standard parameters can have custom values but the key (parameter name) cannot be used for any other task:
| mx.datadriven.file | mx.selenium.server | |
| mx.datadriven.runtype | mx.selenium.enable_video_recording | |
mx.params
All three parameters need to respect their own rules. That means that if you set them like this:
mx.params=user-suite-test
mx.params.method=intersection
mx.params.method.source=test
They are not going to be applied inside the “project” layer, because the “project” layer (where they are defined) is not going to be taken into consideration when setting parameters. Look at “mx.params.source” as an example.
If the parameters were defined like this:
mx.params=user-suite-test-project
mx.params.method=intersection
mx.params.method.source=test
Then they are not going to be applied inside the project, suite or user layer, because these layers will not be in intersection if not defined so in test. Look at mx.params.method and mx.params.method.source as an example.
mx.params.source
|
Default value |
mx.params.source=user-suite-test-project |
|
Possible values |
‘test’, ‘suite’, ‘user’, ‘project’, ‘system’, separated by - |
|
Meaning |
|
- Layers that are defined first have bigger priority:
This parameter will decide in what order parameters can override each other. By default, if you set a suite parameter with the same key as one in a case contained within, this parameter will overwrite the case level parameter when the suite is run. Using mx.params.source will let you change this
Example: ‘mx.params.source=user-test-project’
‘user’ layer has top priority, then ‘test’ and then ‘project’ layer. That means that if the same parameter is defined in the “user” and “test” and “project” layer, the one in the “user” layer will be used.
- If the parameter is only declared and it’s value is not defined, it’s value could be the value from some layer that has lower priority. Example 5 explains in which situations that happens.
- “suite” layer exists only if suite is running
- The value “system” should not be used in “mx.params.source” parameter
Examples:
layers
|
user |
suite |
test |
project |
system |
|
fruit=cherry |
fruit=banana |
fruit=apple |
fruit=pear |
fruit=grapes |
|
.. |
.. |
.. |
.. |
.. |
1) If test layer had the parameter mx.params.source=test, the result would be:
fruit=apple
Because the parameter mx.params.source is set to test, the test layer will be used for parameter setup. Other layers will be ignored.
2) If suite or test layer had the parameter mx.params.source=suite-test, the result would be:
fruit=banana
Because the same parameter is in the “suite” and “test” layer, the parameter from the layer with bigger priority will be used. In this case the “suite” layer has a bigger priority than the “test” layer.
3) If “user”, “suite”, “test” or “project” layer had the parameter “mx.params.source=user-suite-test-project”, the result would be:
fruit=cherry
Because the same parameter is in different layers, the parameter from the layer with the biggest priority will be used. In this case the “user” layer has the biggest priority.
4) If “test”, “suite” or “project” layer had the parameter “mx.params.source=test-suite-project-test”, the result would be:
fruit=apple
You can mention one layer multiple times.
Because the “test” layer has the biggest priority, the value of the parameter is “apple”
layers
|
user |
suite |
test |
project |
system |
|
fruit= |
fruit=banana |
fruit= |
fruit=pear |
fruit= |
|
.. |
.. |
.. |
.. |
.. |
5) If the “test” or “project” layer had the parameter “mx.params.source=suite-test-project”, the result would be:
|
If suite is run: fruit=banana Because the case is run from a suite, we have a “suite” layer. Because “suite” layer has bigger priority than “test” and “project” layers, parameter will take value from the “suite” layer |
If case is run: fruit=pear If the case is run individually, “suite” layer doesn’t exist, so we compare “test” and “project” layers. “test” layer has bigger priority, but the parameter “fruit” doesn’t have a value in the “test” layer, so in that case if the value is not set, the layer with smaller priority will be picked. If the parameter exists, we would be using it. If we wanted to not set the parameter value, we could’ve done that in two ways. One way is to delete the parameter “fruit” from the “project” layer, or we could’ve changed the value of the parameter mx.params.source to mx.params.source=user-suite-test, so the “project” layer is not included. |
For more examples, look at the bottom of the “mx.params” category, because in order to understand everything, you need to know what “mx.params.method” and “mx.params.method.source” parameters do.
mx.params.method
|
Default value |
mx.params.method=intersection |
|
Possible values |
‘union’, ‘intersection’ |
|
Meaning |
Explains the way in which layers will merge |
- If the value is “union”, then all parameters from the layer specified in mx.params.source will be merged together.
- If the value is “intersection”, then all parameters of the layer will be intersected with the layer specified in mx.params.method.source
- “intersection”, are not common elements in all layer but intersection in relation to layer specified with parameter mx.params.method.source
Examples:
layers
|
user |
suite |
test |
project |
system |
|
fruit=cherry |
fruit=banana |
fruit=apple |
fruit=pear |
fruit=grapes |
|
food=pizza |
||||
|
seasons=winter |
- If “test” or “project” layers had the following parameters: ‘mx.params.source=test-project’ i ‘mx.params.method=union’ the result would be:
- If “test” or “project” layers had the following parameters: ‘mx.params.source=test-project’ i ‘mx.params.method=intersection’ the result would be:
fruit=apple
food=pizza
seasons=winter
fruit=apple
food=pizza
If you wonder why the result is not
fruit=apple
Look at the explanation of parameter ‘mx.params.method.source’
For more examples look at the end of mx.params category, because in order to understand everything you need to know what “mx.params.source” and “mx.params.method.source” parameters do.
mx.params.method.source
|
Default value |
mx.params.method.source=test |
|
Possible values |
‘test’, ‘suite’, ‘user’, ‘project’, ‘system’ |
|
Meaning |
Determines what is intersection for layers when parameter ‘mx.params.method’ has value ‘intersection’ |
Default value
mx.params.method.source=test
Possible values
‘test’, ‘suite’, ‘user’, ‘project’, ‘system’
Meaning
Determines what is intersection for layers when parameter ‘mx.params.method’ has value ‘intersection’
- If the value of parameter “mx.params.method” is “union”, the parameter “mx.params.method.source” is ignored.
- The value “system” should not be used.
Examples:
layers
|
user |
suite |
test |
project |
system |
|
fruit=cherry |
fruit=banana |
fruit=apple |
fruit=pear |
|
|
animal=cat |
animal=dog |
|||
|
seasons=summer |
seasons=winter |
|||
|
food=pizza |
||||
|
instrument=guitar |
- If the case parameters were ‘mx.params.source=user-suite-test-project’, ‘mx.params.method=intersection’ and ‘mx.params.method.source=test’ the result would have parameters:
- If the case parameters were ‘mx.params.source=user-suite-test-project’, ‘mx.params.method=intersection’ and ‘mx.params.method.source=suite’ the result would have parameters:
- If the case parameters were ‘mx.params.source=user-suite-test-project’, ‘mx.params.method=union’ and ‘mx.params.method.source=user the result would have parameters:
fruit=cherry
animal=cat
food=pizza
Because the value of parameter ‘mx.params.method.source’ is ‘test’ we will have only “test” layer parameters.
fruit=cherry
Because the value of parameter ‘mx.params.method.source’ is ‘suite’ we will have only “suite” layer parameters.
fruit=cherry
animal=cat
seasons=summer
food=pizza
Because the value of parameter ‘mx.params.method’ is ‘union’, parameter ‘mx.params.method.source’ is ignored and result contains union of parameters from all the layers that are mentioned in “mx.params.source” parameter.
Examples:
layers
|
user |
suite |
test |
project |
system |
|
fruit=cherry |
fruit=banana |
fruit=apple |
fruit=pear |
|
|
animal=cat |
animal=dog |
|||
|
vegetables=carrot |
vegetables=pepper |
|||
|
seasons=summer |
seasons=winter |
|||
|
drink=beer |
drink=water |
|||
|
food=pizza |
||||
|
color=green |
color=red |
color=pink |
||
|
sport=basketball |
sport= |
sport=tennis |
||
|
instrument=guitar |
- All 3 parameters have default value and they are not defined in any layer (we can do that in case parameters)
- The result has only parameters that “test” layer has, because parameter “mx.params.method” has value “intersection”, which means that the intersection of the layer will be made in relation to “test” layer that we see from parameter “mx.params.method.source=test”
- The value for fruit is “cherry” because parameter “mx.params.source” has a “user” layer, then “suite”, then “test” and, in the end, “project” layer. When the same parameter exists in multiple layers the one with highest priority compared to the “test” layer will be used (mx.params.method.source=test), and in this case that’s “user” layer.
- The value for animal is “cat” because that parameter is not defined in any layer with higher priority (“user” and “suite”) compared to “test” layer (mx.params.method.source=test). It is however defined in a layer with lower priority but will not be applied because the parameter has value in the “test” layer.
- The value for food is “pizza” because that parameter is not defined in layer with higher priority (“user” and “suite”) compared to “test” layer (mx.params.method.source=test)
- The value for sport depends if the case is run inside the suite or on it’s own. If it’s run inside a suite, the value will be “basketball” because the “suite” layer has higher priority than the “test” layer. If it’s run on its own, the “suite” doesn’t exist and the parameter sport exists in two places: in the “test” layer and in the “project” layer. In that case the “test” layer has higher priorities, but because parameter sport in the “test” layer doesn’t have value, the value will be looked in layers that have lower priority and if it exists it will be used. In this case, parameter sport exists in the “project” layer and has value “tennis” so that value will be used.
- If we use “union” instead of “intersection” for mx.params.method and we define these 3 parameters somewhere in “user”, “suite”, “test” or “project”:
- The value for fruit is “cherry” because parameter ‘mx.params.source’ has a ‘user’ layer, then ‘suite’, then ‘test’ and in the end, ‘project’ as the last layer. When the same parameter exists in multiple layers, the one with the higher priority will be used, and in this case that's the “user” layer.
- The value for animal is “cat” because the layer with the highest priority is ‘test’ layer.
- The value for seasons is “summer” because parameter ‘mx.params.source’ has a ‘user’ layer, then ‘suite’, then ‘test’ and in the end ‘project’ as the last layer. When the same parameter exists in multiple layers, the one with the higher priority will be used, and in this case that's the “user” layer.
- Value for food is “pizza” because the layer with the highest priority is “project” layer.
- The value for color is "green” because parameter ‘mx.params.source’ has a ‘user’ layer, then ‘suite’, then ‘test’ and in the end, ‘project’ as the last layer. When the same parameter exists in multiple layers, the one with the higher priority will be used, and in this case that's the “user” layer.
- The value for sport depends if the case is run inside a suite or on it’s own. If it’s run inside suite, the value will be “basketball”, because “suite” layer has bigger priority than “test” layer, but if it’s run on its own, then “suite” layer doesn’t exist and parameter sport exists in two places: in “test” layer and in “project” layer. In that case the “test” layer has higher priority, but because parameter sport doesn’t have value in the “test” layer, it will be searched for in layers that have smaller priority, and it will be used if it exists. In this case parameter sport exists in the “project” layer and has value “tennis” so that the value will be used.
- If the parameters are defined inside suite parameter:
- The result has only parameters that “suite” layer has, because parameter “mx.params.method” has value “intersection”, which means that intersection will be applied to layer in relation to “suite” layer, based on parameter “mx.params.method.source=suite”.
- The value for fruit is “apple”, not “banana”, because in parameter “mx.params.source” we specified that the “test” layer parameter has higher priority than “suite” layer. Also because the value “mx.params.source” doesn’t contain a “user” nor “project” layer, their parameters will be ignored, so the value can’t be taken from them.
- The value of vegetable is “pepper” because in parameter “mx.params.source”, we specified which layer will be looked at and which priority the layers have. There is no layer with higher priority that has that parameter. Other layers that have it aren’t included because we didn’t specify them in “mx.params.source”.
- Value of parameter color is “red” because in parameter “mx.params.source” we specified which layer will be looked at and which priority the layers have. There is no layer with higher priority that has that parameter. Other layers that have it aren’t included because we didn’t specify them in “mx.params.source”.
- Value for sport is basketball though the ‘test’ layer has higher priorities, but because parameter sport in ‘test’ layer doesn’t have value, it will be looked for in a layer that has lower priority and if exists, will be used. In our case, parameter sport exists in the “suite” layer and has the value “basketball”, so that the value will be used.
mx.params.source=user-suite-test-project
mx.params.method=intersection
mx.params.method.source=test
The result would be:
fruit=cherry
animal=cat
vegetables=carrot
food=pizza
sport=basketball or tennis
mx.params.source=user-suite-test-project
mx.params.method=union
mx.params.method.source=test
The result would be:
fruit=cherry
animal=cat
seasons=summer
drink=beer
food=pizza
color=green
sport=basketball or tennis
Parameter ‘mx.params.method.source’ is ignored because the value of the parameter ‘mx.params.method’ is ‘union’.
Because the value of the parameter “mx.params.method” is “union”, the result contains all parameters that are defined in layers which are specified in “mx.params.source”. In our case that’s “user”, “suite”, “test” and “project” layers. Parameters from the “system” layer are not included in the utmost result because that layer is not defined in parameter “mx.params.source”, therefore we don’t have parameter “instrument”. That’s good because “system” layer parameters should be avoided in “mx.params.source”.
mx.params.source=test-suite
mx.params.method=intersection
mx.params.method.source=suite
Then the result would be:
fruit=apple
vegetables=pepper
color=red
sport=basketball
This makes sense only for suite runs, so we will cover that case only.
mx.run.time_to_live
|
Default value |
mx.run.time_to_live=300 |
|
Possible values |
Number between 0 and 300 |
|
Meaning |
Specifies maximum allowed time for a case run in seconds |
- If we don’t have the parameter set, the default value will be used
- Maximum run time for every case is 300 seconds (5 minutes) and can’t be higher than that.
- The user can put in a smaller value than 300 seconds, for example 60 seconds. If the case would finish in 20 seconds, everything would be fine, but if the case carries on for more than 60 seconds it will fail with a message that the maximum time exceeded.
Examples
mx.run.time_to_live=60
- With this parameter, we limited the case run to 60 seconds.
- If the case finishes its run in 20 seconds, it will not be interrupted.
- If the case would run for more than 60 seconds, it will be stopped on the 60th second with a notification that the maximum time duration is passed.
mx.run.time_to_live=360
- With this parameter, we specified that the maximum run time of a case is 360 seconds, but because the maximum value for parameter “mx.run.time_to_live” is 300 seconds, the value will be ignored and the case will stop after 300 seconds.
- If the case would run for less than 300 seconds, for example 90 seconds, it will not be interrupted.
- If the case runs for more than 300 seconds, the case will be stopped on the 300th second with a notification that the maximum time duration is passed.
mx.run.case.repeat_on_failure
|
Default value |
mx.run.case.repeat_on_failure=0 |
|
Possible values |
Any positive whole number. |
|
Meaning |
For a failed test, specifies how many times it will repeat the run until it succeeds. |
If we do not set this parameter, no runs will be repeated.
If you manually stop the run via the MaxTAF Cloud user interface, the parameter value will be ignored and no further runs will be created.
Examples
mx.run.case.repeat_on_failure=3
- With this parameter set, if the case consistently fails, then 3 extra runs will be created.
- If any of the cases that are created via this parameter end as a passed case, then no further cases will run.
mx.notify
mx.notify
|
Default value |
mx.notify=never |
|
Possible values |
‘pass’, 'fail', 'always' or ‘never’ |
|
Meaning |
Specifies if and when an email notification about case run results will be sent. |
If no email is specified using the following parameter mx.notify.email, an email notification would be sent to the project owner's email address.
- If the value of mx.notify is ‘fail’ the notification will be sent only if the run stops due to a failure.
- If the value of mx.notify is ‘pass’ the notification will be sent only if the run succeeded.
- If the value of mx.notify is ‘always’ the notification will be sent when the run finishes.
- If the value of mx.notify is ‘never’ no notification would be sent.
mx.notify.email
|
Default value |
Email address of the owner of the project |
|
Possible values |
Email address, or email addresses separated by ‘,’ (comma) character |
|
Meaning |
If the parameter “mx.notify” has value “true”, then this parameter specifies to which email addresses should the notification be sent. |
- If we want the notification to be sent to email@example.com, we would do that in the following way:
mx.notify.email=email@example.com
- If we want to send the notification to multiple email addresses, we would do that in the following way:
mx.notify.email=email.1@example.com, email.2@example.com
- If parameter “mx.notify” has the value “never” or if no value is specified, parameter “mx.notify.email” will be ignored as there is no run outcome that will cause a notification to be sent.
Notify Examples:
1) If there is no mx.notify.email parameter set and the value for mx.notify was set in the following way:
mx.notify=fail
The email would be sent to the owner of the project and only if the run failed.
2) If the parameters mx.notify.email and mx.notify were set in the following way:
mx.notify.email=email@example.com
mx.notify=always
The notification would be sent to email@example.com whenever the case completed a run.
3) If the parameters mx.notify and mx.notify.email were set in the following way:
mx.notify=pass
mx.notify.email=email@example.com
If the run succeeds, the notification will be sent to the email address: email@example.com
4) If the parameters mx.notify and mx.notify.email were set in the following way:
mx.notify=always
mx.notify.email=email.1@example.com,email.2@example.com,email.3@example.com
Every time the case's run finishes, an email notification would be sent to the following email addresses: email.1@example.com,email.2@example.com,email.3@example.com
mx.datadriven
mx.datadriven.file
|
Default value |
|
|
Possible values |
Location of the data driven file |
|
Meaning |
Specifies case as a data driven case and points to a location of the data driven file. |
- The supported file types (extensions) are .csv and .xls (.xlsx)
- If the value of the parameter “mx.datadriven.file” is, for example, “/dd/data.csv” then it will use the data.csv file stored in the directory dd.
But if before we run the case, we pass a data driven file from the UI, by using the Data driven option in the advanced run settings, then the parameter will be ignored, and the file that was passed from the UI will be used.
- If the parameter “mx.datadriven.file” has a set value, the case will count as a data driven case. This will create a multi-run of the case, creating as many runs as there are rows of data in the file.
Example:
1) If the parameter ‘mx.datadriven.file’ was set in the following way:
mx.datadriven.file=/dd/data.csv
That would mean that the case is data driven and that the data driven file is at the location “/dd/data.csv”
mx.datadriven.runtype
|
Default value |
mx.datadriven.runtype=serial |
|
Possible values |
‘serial’ or ‘parallel’ |
|
Meaning |
Specifies in what way would we execute the rows from the data driven file. |
- If the value of the parameter is set to parallel in the case parameters, but we set it to serial via the advanced run options under the menu params, the data driven rows would be executed in serial because the run dialog has higher priority.
mx.datadriven.name.###
|
Meaning |
With the help of that parameter, we can get the value of the column from a data driven file by a column name. |
- This parameter is always used as a value for another parameter.
- This parameter is only relevant to csv files with a header row. If there isn't a header row use to mx.datadriven.col.###.
Examples:
- If we want to get the value for parameter “place” for a column named “city” inside the data driven file, we could do that in the following way:
place=${mx.datadriven.name.city}
For “${}” usage, refer to our documentation.
mx.datadriven.col.###
|
Meaning |
With the help of that parameter, we can get the value of the column from a data driven file by a column number. |
- This parameter is always used as a value for another parameter.
Examples:
- If we want to get the value for parameter “place” from 3rd column inside the data driven file,
we could do that in the following way:
place=${mx.datadriven.col.3}
For “${}” usage, refer to our documentation.
mx.bridge.address
|
Values |
If the bridge is active, the value of the parameter is bridge address, if not, it has no value |
|
Meaning |
Specifies bridge address |
- Its specification is in the “user” layer.
- It exists only when MaxTAF Bridge is active (Look at MaxTAF Bridge documentation).
mx.selenium
mx.selenium.server
|
Default value |
|
|
Possible values |
“${mx.system.common_pool}”, “${mx.system.private_pool}” or selenium server address. Example: “http://1.1.1.1:4444/wd/hub” |
|
Meaning |
This parameter specifies the selenium server address on which cases should be executed |
- If the value is “${mx.system.common_pool}”, the common pool will be used for running the cases. Common pool is a pool of selenium nodes that everyone using MaxTAF Cloud shares. See more in the common pool section.
- If the value is “${mx.system.private_pool}”, the private pool will be used for running the cases. Private pool is a pool of selenium nodes that only you use, and are created on demand. See more in the private pool section.
- If the bridge is active, the parameter will have the following value: ‘mx.selenium.server=${mx.user.mx.bridge.address}/wd/hub’. The configuration for this is in the “user” layer.
mx.selenium.enable_video_recording
|
Default value |
mx.selenium.enable_video_recording=false |
|
Possible values |
‘true’ or ‘false’ |
|
Meaning |
This parameter specifies if the video of the case run should be saved as a recording |
- If the parameter mx.selenium.enable_video_recording is set to true, the video will be recorded during the execution of the case, and when the case finishes, the video will appear under the video section of the run details.
mx.selenium.browser
|
Default value |
mx.selenium.browser=chrome |
|
Possible values |
‘edge’, ‘chrome’ or ‘firefox’ |
|
Meaning |
Specifies which browser should be used when running a case |
- For more information on changing the browser for a case click here.
mx.selenium.proxy
|
Default value |
|
|
Possible values |
Address of any HTTP proxy server |
|
Meaning |
Specifies which HTTP proxy server should be used in order to route requests |
- Pretty useful if you want location consistency. For example a case that does Google Searches in the United Kingdom only.
mx.[layer].###
In order to understand these parameters, it is necessary to understand layers and variables.
mx.test.### mx.suite.### mx.user.### mx.project.### mx.system.### are not parameters but prefixes, and they are used for retrieving values of the parameters that exist in some other layer.
“mx” stands for “MaxTAF”, and next word specifies the layer and can be test, suite, user, project or system
Example:
- If we have parameter “time” inside “project“ layer and we want to get its value, we could do that in the following way:
- If we have a parameter “time” in “user” layer and we want to get its value, we could do that in the following way:
- If we have parameter “time” in “suite” layer and we want to get its value, we could do that in the following way:
timeValue=${mx.project.time}
timeValue=${mx.user.time}
timeValue=${mx.suite.time}
That will only work if we ran a case inside a suite, because if we do not, there will be no “suite” layer
Custom Parameters
Custom parameters are parameters where the name and value are chosen by the user, they do not serve a specific function in MaxTAF other than to be read and used by cases. They are functionally identical to Strings in programming.
In the above screenshot, the value for the 'colour' parameter (red) can be read as a string in the case script.
For more information on using custom parameters in cases click here.
Project Parameters
Each project has a list of customisable parameters available to it.
As with other custom parameters, you can choose the name and value assigned to each parameter. That being said, it is best to avoid changing the parameters with the prefix mx, as these are reserved for specific functions in MaxTAF.
Retrieving Project Parameters
Retrieving Project Parameters Into Case Variable
Every case can retrieve these values using the ApiService method getProjectParam(paramName) where paramName is the name assigned to the project parameter.
Example:
String food = mxService.getProjectParam(“fruit”);
In the above example, the case will look for a parameter named fruit and assign its value to a String food.
For the full list of ApiService Methods read here.
Retrieving Project Parameters Into Case Parameter
If you have set a project parameter, you can retrieve it as the value of a case parameter using the following format: CASEPARAM=${mx.project.PARAMETERNAME}. When using this format, the only things you change are CASEPARAM and PARAMETERNAME.
Example:
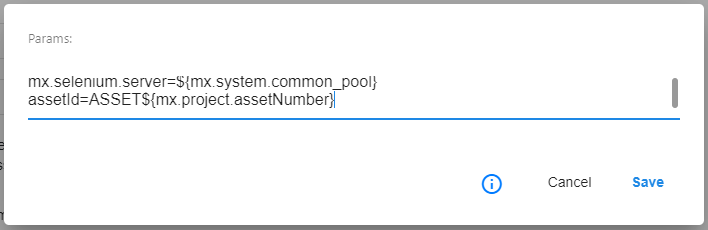
As shown above, when assigning a project parameter as the value for a case parameter, you can concatenate the value to another string value. If the value of the project parameter assetNumber is set to 1034, the value of the case parameter assetId will be ASSET1034.
Setting Project Parameters
Cases can also set the value of a project parameter using the ApiService method setProjectParam(paramName, value) where paramName is the name of the project parameter and value is the new value to assign to the parameter.
Example:
mxService.setProjectParam(“fruit”, “orange”);
In this example, the case will look for a parameter named fruit and assign it the value orange. If it cannot find said parameter it will create a new one with the name fruit and the value orange.
For the full list of ApiService Methods read here.
Setting project parameters in this way is useful when you want to share some information between cases that are not a part of the same suite. If they are in the same suite it would be better to use the method detailed in the suites section here.
Incrementing Project Parameters
When project parameters are created they can be set to auto-increment. Auto-increment means that if you enter a whole number as the value for the parameter, every time it is retrieved, the value increases by one.

In the following example, we have created a project parameter with the auto-increment option ticked:

When we execute a case with the following line of code within its script:
mxService.getProjectParam("timesAccessed");
We can see in the project parameters page the value of the timesAccessed parameter has increased by one.

Project Maintenance
Project Backup
When you create a MaxTAF Cloud project, all your project data is backed up in our project database. However, we still encourage users to back up their data regularly.
To back-up a whole project, use the Export Project button. You can find this button in the project settings page.
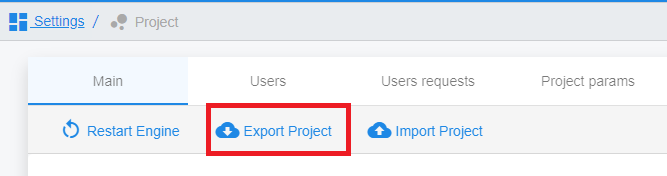
Once you confirm the export, MaxTAF will create a backup of the following project assets:
- Cases
- Suites
- Schedules
- File system files
- Project parameters
Note: Runs will not be backed up. To back up runs, you will need to download the runs folder in the file system for your project.
Restoring a Project from a Backup
Once you have a project export file generated by clicking the Export Project button, you can import said file to add the data into your any other project. To do this, use the Import Project button found next to the export button.
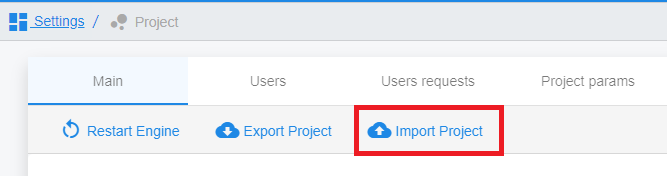
When you click Import Project you will see options regarding what specifically areas of the project you specifically want to overwrite via import.
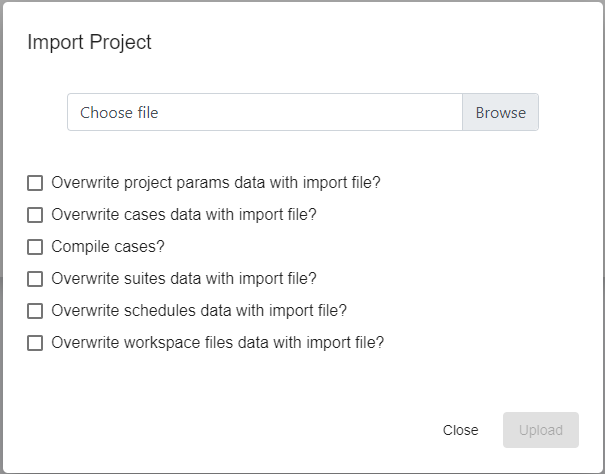
Data backup
The following items are what you need to focus on when backing up a project:
- Suites
- Cases
- Workspace
- Project Parameters
- Schedules (optional)
Exporting All Suites
Exporting suites will also export the items contained within those suites, whether they are cases or other suites.
To export all suites on the project you need to:
- Navigate to the Suites list via the navigation menu.
- Click the export button at the top.
- Confirm the export in the following dialog and an export file will start downloading.
Note: do not select any suites or only those that are selected will be exported.
To find out how to export suites individually click here.
Importing a Suite Backup
To import your backed up suites into a new project:
- Navigate to the suites page.
- Click "import" near the top of the list.
- Using the file browser in the following dialog, select the suites export file.
- Confirm to rebuild the suites in this project.
Exporting All Cases
For any cases that are not a part of your suite, you can choose to either download them individually or you can just download every case.
To export all the cases in the project:
- Navigate to Cases page via the navigation menu.
- Click the export button at the top of the page.
- Confirm the export and an export file will start downloading.
Note: as is the case with suite exports, if you select any cases by ticking the checkbox, only those that are selected will be exported. So don't do that if you want to export every case.
To learn about exporting cases individually click here.
Importing a Case Backup
To import your backed up cases into a new project:
- Navigate to the cases page.
- Click "import" near the top of the list.
- Using the file browser in the following dialog, select the cases export file.
- Confirm to rebuild the cases in this project.
Backing up the Workspace
To backup all the files your project, you will need to download the file system as zip. To do this:
- Navigate to the file system page via the navigation menu.
- Right click on the root folder and click download.
Clicking download on a folder will automatically compress the folder before downloading it as a zip file.
Considering your project may have a large amount of memory consumed by runs you can alternatively backup everything but the runs folder. To do this:
- Navigate to the file system page.
- For each language used in your project, right-click and download the folder containing said language.
To be even more efficient with space you can navigate within the folder to the inner folder containing each case file and, if needed, the folder containing non-case files used by your cases.
Restoring your Workspace
Restoring the file system is probably best done before restoring any of the other
Backing Up the Project Parameters
To backup all project parameters on your project:
- Navigate to Settings > Project > Project Parameters.
- Click the export button at the top of the tab without selecting anything.
- This will download the export file containing the project parameters.
Importing a Project Parameter Backup
To import your backed up project parameters into a new project:
- Navigate to Settings > Project > Project Parameters.
- Click "import" near the top of the list.
- Using the file browser in the following dialog, select the project parameter export file.
- Confirm to rebuild the project parameters in this project.
Exporting Schedules
While you may not have enough schedules to warrant following this process as opposed to recreating the schedules in the case of data loss. You can export schedules in a nearly identical way as you would with Cases/Suites.
To perform this backup:
- Navigate to the Schedules page.
- Click "Export" near the top of the list of schedules.
- Confirm in the next dialog to download the file containing the means of recreating the schedule list.
Importing a Schedule Backup
To import your backed up schedules into a new project:
- Navigate to the schedules page.
- Click "import" near the top of the list.
- Using the file browser in the following dialog, select the schedule export file.
- Confirm to rebuild the schedules in this project.
Note: importing a schedule will import its scheduled item too. So if you have suites in some of your schedules, it will also import the cases within those suites too.
Advanced Features
Data Driven Testing
Data Driven Testing is possible in MaxTAF Cloud.
What is Data Driven Testing?
Data Driven Testing is the process in which parameterized regression scripts are procedurally run with a different data scenarios, provided by rows of data in a spreadsheet.
In simpler terms, when you run a data driven case, you run the same script many times, but different variables such as asset types or failure classes that are fed into each iteration of the case you are running.
The nature of the data is determined by a spreadsheet you supply, with the number of rows equalling the number of runs (data scenarios) and each column referring to a discrete piece of data in the data scenario.
How do I run Data Driven Testing with MaxTAF?
Data Driven Testing requires preparation in three areas:
Parameters:
In the parameters field of your main tab, configure parameters so that those prepared in your script can be fed data from your data file.
Data is contained in a file in the file system specified by "mx.datadriven.file" parameter.
Add a new parameter in "Main" tab with the name mx.datadriven.file and set its value to the location of the data driven file relative to your file system (location can be found by right clicking the file and clicking "properties"), for example:
mx.datadriven.file=/dd/wiki_search.csv
This parameter will search the file in root folder, then dd folder and there it will find wiki_search.csv
After that, specify parameters with custom names for columns and take the columns from data driven file like this:
query=${mx.datadriven.name.query}
expected_title=${mx.datadriven.name.expected_title}
At run time, there will be a separate run for every row in the data file and each time, the case parameters will receive new values from the columns with the specified name e.g. ${mx.datadriven.name.language}. In this example, because we used the datadriven name parameter, the first row is treated as a header row.
When there is no header row, the value can be specified by the column's number e.g. query=${datadriven.col.2}
The first row in a data driven file is treated as header row and it is used to identify the column by name (example: mx.datadriven.name.language).
Then you need to specify if the rows inside data driven file are to be treated and run as parallel cases:
mx.datadriven.runtype=parallel
Script:
Follow the instructions to parameterize your script where you wish the data to be changed, so that you may modify your script parameters in the ‘main’ tab.
All you need to do in your case script is get the data driven parameter you set in parameters (via mxService for example) and use them like you would with normal parameters:
String queryFromFile = mxService.getParam("query");
String expectedTitle = mxService.getParam("expected_title");
Note: All parameters are treated as Strings, so if you expect a number for example, you would need to add logic to your code to parse it into the correct data type.
Spreadsheet:
The spreadsheet you use can be created in either CSV or Excel format.
Each row will correspond to a different data scenario/case run.
Each column will correspond to the different parameters you have defined.
Running Cases in other Browsers
Currently MaxTAF only executes cases in a linux environment.
MaxTAF Cloud officially supports:
- Google Chrome
- Mozilla Firefox
The browser that we recommend as it was tested the most thoroughly is Google Chrome.
In order to use a specific browser with a case, do the following:
- Open any UI case
- In the “Params” section click on the pencil icon to edit the parameters for that case
- Set the mx.selenium.browser parameter to “chrome” or “firefox” just as it is done in the picture below:
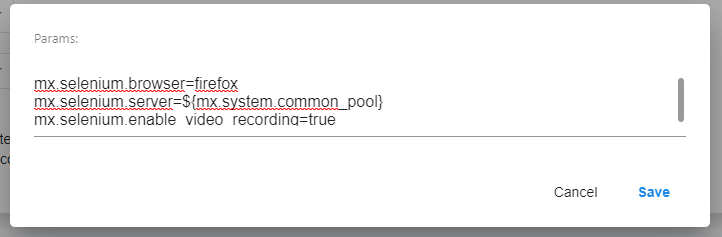
By default, if the “mx.selenium.browser” parameter is not set, MaxTAF Cloud will use Google Chrome.
Email Notifications are available for case and suite runs.
See the parameters to set up notifications here.
Network and Infrastructure
API Service
API Service provides communication between MaxTAF Cloud and cases. API Service is required for passing case parameters to test, saving screenshots, generating xml reports etc. MaxTAF Cloud has an ApiService class for every supported language.
Getting started with API Service
Java
To use the API Service in a Java case, your class needs to create an ApiService as you would with any other Java Object. This is best done outside of any methods in your case.
package com.maxtaf;
import org.junit.Test;
import com.maxtaf.ApiService;

public class JavaTestClass {

	ApiService mxService = new ApiService();

	@Test
	public void test() {

        . . .

	}
}
If you need to instantiate ApiService within a static method you just need to move the instantiation of the ApiService object to within the static method in question.
package com.maxtaf;
import com.maxtaf.ApiService;

public class JavaTestClass {

	public static void main(String[] args) {

		ApiService mxService = new ApiService();

        . . .

	}
}
Python
To use API Service in a Python case, you need to instantiate the ApiService object as though it were any other python object. In order to do this you have to import the ApiService functionality first.
import pytest
from maxtafapiservice import ApiService

class TestPython:
    mxService = ApiService()

    . . .
JavaScript
To use API Service in a JavaScript case, you have to import the ApiService object and then instantiate it before your test code.
const ApiService = require("../maxtaf/maxtafapiservice.js")
const assert = require("assert")

describe("JavaScriptApiService", function() {
    mxService = new ApiService()

    . . .

})
API Service methods
JAVA
|
Method name |
|
|
Input parameters |
none |
|
Return type |
String |
|
Throws |
Exception |
|
Description |
This method is used to get all case parameters as a String divided by \n |
|
Example |
String myCaseParams = mxService.getAllParams(); |
|
Method name |
|
|
Input parameters |
paramName: String |
|
Return type |
String |
|
Throws |
Exception |
|
Description |
This method is used to get a specific case parameter as a String |
|
Example |
String myCaseParam = mxService.getParam(“nameOfMyParam”); |
|
Method name |
|
|
Input parameters |
none |
|
Return type |
List<SystemParam> |
|
Throws |
Exception |
|
Description |
This method is used to get all system parameters as a list of type SystemParam |
|
Example |
List<SystemParam> systemParams = mxService.getAllSystemParams(); |
|
Method name |
|
|
Input parameters |
paramName: String |
|
Return type |
String |
|
Throws |
Exception |
|
Description |
This method is used to get a specific system parameter value as a String |
|
Example |
String systemParamValue = mxService.getSystemParam(“someSystemParam”); |
|
Method name |
|
|
Input parameters |
none |
|
Return type |
List<ProjectParam> |
|
Throws |
Exception |
|
Description |
This method is used to get all project parameters as a list of type ProjectParam |
|
Example |
List<ProjectParam> projectParam = mxService.getAllProjectParams(); |
|
Method name |
|
|
Input parameters |
paramName: String |
|
Return type |
String |
|
Throws |
Exception |
|
Description |
This method is used to get a specific project parameter value as a String |
|
Example |
String projectParamValue = mxService.getProjectParam(“someProjectParam”); |
|
Method name |
|
|
Input parameters |
projectParam: ProjectParam |
|
Return type |
ProjectParam |
|
Throws |
Exception |
|
Description |
This method is used to create/update a project parameter (if a project parameter with the same name already exists then that parameter will be updated, otherwise a new project parameter will be created) |
|
Example |
ProjectParam myProjectParam = new ProjectParam(); myProjectParam.setName(“projectParamName”); myProjectParam.setValue(“this is a value”); myProjectParam.setAutoIncrement(false); myProjectParam.setDescription(“This is example project param”); myProjectParam = mxService.setProjectParam(myProjectParam); // or mxService.setProjectParam(myProjectParam); |
|
Method name |
|
|
Input parameters |
paramName: String paramValue: String |
|
Return type |
ProjectParam |
|
Throws |
Exception |
|
Description |
This method is used to create/update a project parameter with “autoIncrement=true”(if a project parameter with the same name already exists then that parameter will be updated, otherwise a new project parameter will be created) |
|
Example |
ProjectParam myProjectParam = mxService.setProjectParam(“projectParamName”, “projectParamValue”); //or mxService.setProjectParam(“projectParamName”, “projectParamValue”); |
|
Method name |
|
|
Input parameters |
paramName: String paramValue: String autoIncrement: boolean |
|
Return type |
ProjectParam |
|
Throws |
Exception |
|
Description |
This method is used to create/update a project parameter (if a project parameter with same name already exists then that parameter will be updated, otherwise a new project parameter will be created) |
|
Example |
ProjectParam myProjectParam = mxService.setProjectParam(“projectParamName”, “projectParamValue”, false); // or mxService.setProjectParam(“projectParamName”, “projectParamValue”, false); |
|
Method name |
|
|
Input parameters |
paramName: String |
|
Return type |
String |
|
Throws |
Exception |
|
Description |
This method is used to increment a project parameter and return the incremented value as a String. If the parameter can’t be incremented, the method will return null |
|
Example |
String incrementedValue = mxService.incrementProjectParam(“projectParamName”); |
|
Method name |
|
|
Input parameters |
paramName: String |
|
Return type |
void |
|
Throws |
Exception |
|
Description |
This method is used to delete a project parameter |
|
Example |
mxService.deleteProjectParam(“projectParamName”); |
|
Method name |
|
|
Input parameters |
progress: int |
|
Return type |
void |
|
Throws |
Exception |
|
Description |
This method is used to set the overall run progress represented as a percentage |
|
Example |
mxService.setRunProgress(17); mxService.setRunProgress(50); mxService.setRunProgress(89); mxService.setRunProgress(100); |
|
Method name |
|
|
Input parameters |
log: String |
|
Return type |
void |
|
Throws |
Exception |
|
Description |
This method is used to append a new String to the run log |
|
Example |
mxService.addLog(“This is a log”); |
|
Method name |
|
|
Input parameters |
log: String |
|
Return type |
void |
|
Throws |
Exception |
|
Description |
This method is used to append a String to the run log with the new line character at the end |
|
Example |
mxService.addLogLine(“This is a log line”); |
|
Method name |
|
|
Input parameters |
title: String description: String testClass: String author: String date: Date |
|
Return type |
void |
|
Throws |
Exception |
|
Description |
This method is used to create a new run report. This should be done before any test methods are called |
|
Example |
Date date = new Date(); mxService.createReport("Report title", "Report description", "testClass", "Name of author", date); |
|
Result |
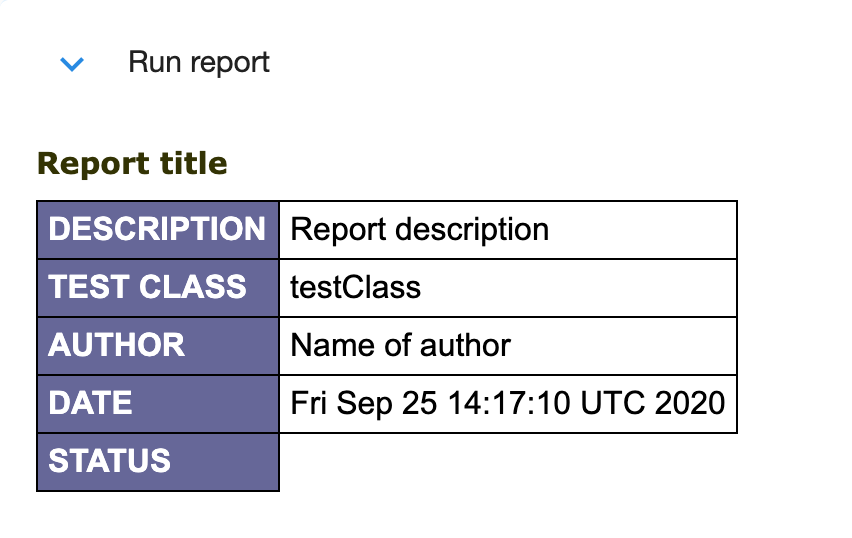 |
|
Method name |
|
|
Input parameters |
status: String (PASSED or FAILED) |
|
Return type |
void |
|
Throws |
Exception |
|
Description |
This method is used to set run the report status. This should be done after every test method has been called |
|
Example |
mxService.setReportStatus(“PASSED”); |
|
Result |
 |
|
Method name |
|
|
Input parameters |
name: String |
|
Return type |
void |
|
Throws |
Exception |
|
Description |
This method is used to create a new test report. This should be done once per test method |
|
Example |
mxService.addTestReport(“My test report”); |
|
Result |
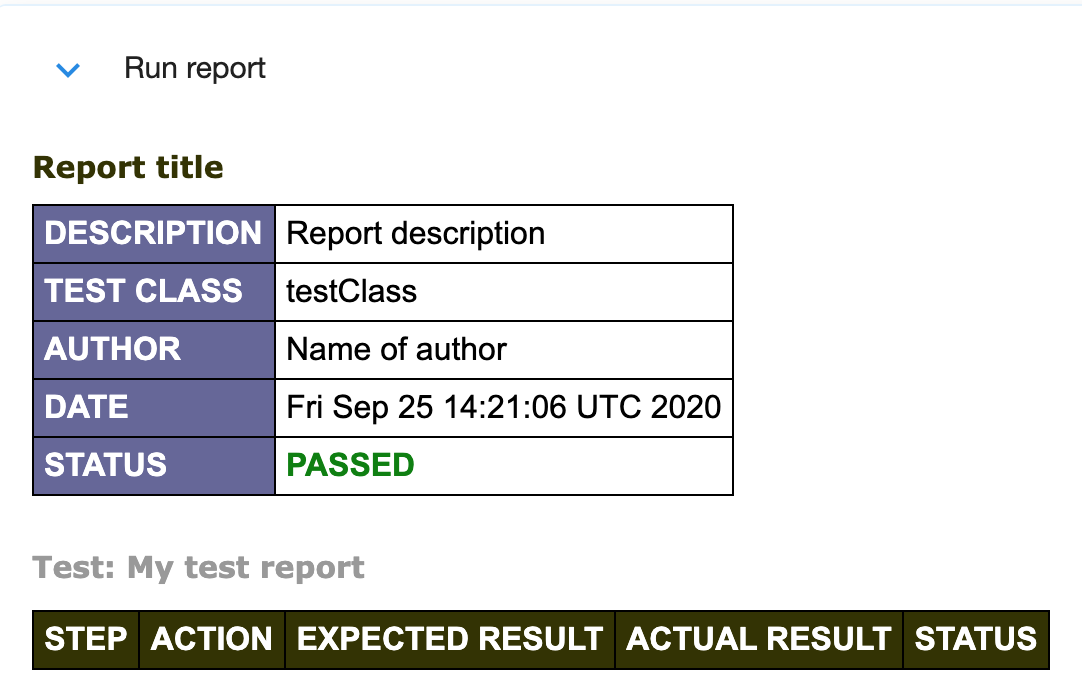 |
|
Method name |
|
|
Input parameters |
testReportName: String (must be same as report name you want to add it to) stepNumber: int action: String expectedResult: String actualResult: String status: String |
|
Return type |
void |
|
Throws |
Exception |
|
Description |
This method is used to append a test step to an already created test report. This should be done as many times as you need per test method |
|
Example |
mxService.addTestReportStep("My test report", 1, "Some action", "63", "78", "FAILED"); mxService.addTestReportStep("My test report", 2, "Another action", "true", "true", "PASSED"); |
|
Result |
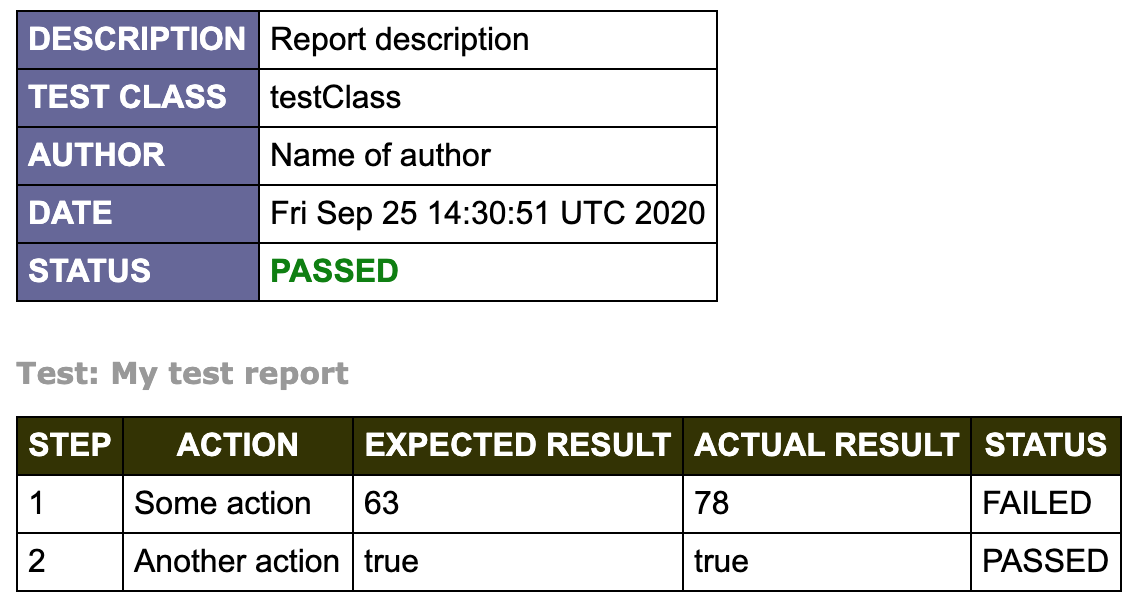 |
|
Method name |
|
|
Input parameters |
paramName: String paramValue: String |
|
Return type |
void |
|
Throws |
Exception |
|
Description |
This method is used to create/update a parameter which is shared between all runs in a specific suite or multirun |
|
Example |
mxService.setSharedRunValue(“paramName”, “paramValue”); |
|
Method name |
|
|
Input parameters |
paramName: String |
|
Return type |
String |
|
Throws |
Exception |
|
Description |
This method is used to get a shared parameter value as a String |
|
Example |
String sharedParamValue = mxService.getSharedRunValue(“paramName”); |
|
Method name |
|
|
Input parameters |
screenshot: byte[] |
|
Return type |
void |
|
Throws |
Exception |
|
Description |
This method is used to save an array of bytes as a screenshot from the Selenium WebDriver |
|
Example |
byte[] screenshot = ((TakesScreenshot) driver).getScreenshotAs(OutputType.BYTES); mxService.saveScreenshot(screenshot); |
|
Result |
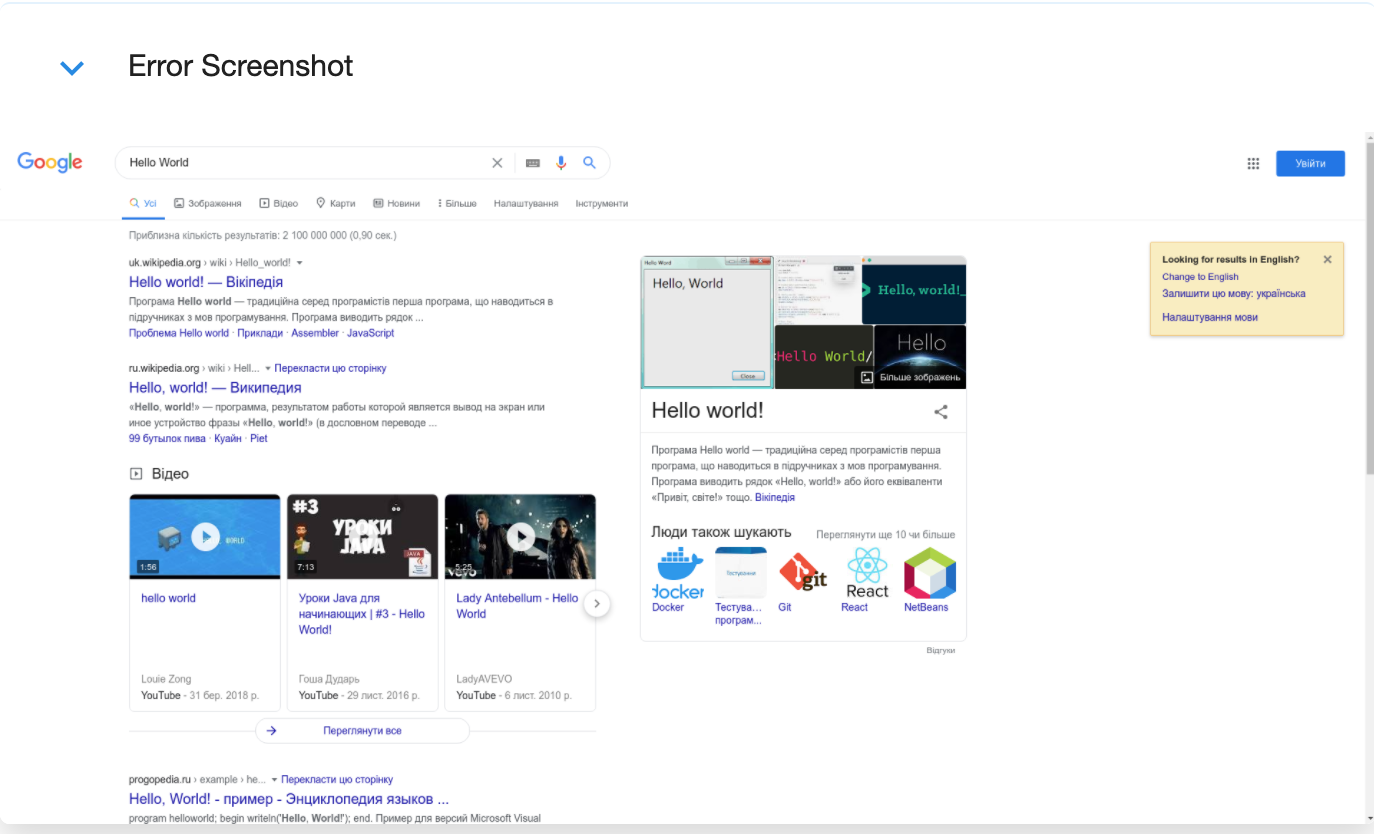 |
|
Method name |
|
|
Input parameters |
caseName: String |
|
Return type |
CaseRunResult |
|
Throws |
Exception |
|
Description |
This method is used to run a case |
|
Example |
mxService.runCase(“My case”); |
|
Method name |
|
|
Input parameters |
caseName: String runDetails: RunDetails |
|
Return type |
CaseRunResult |
|
Throws |
Exception |
|
Description |
This method is used to run a case with additional run details |
|
Example |
RunDetails runDetails = new RunDetails(); runDetails.setSyncAsync(SyncAsync.SYNC); runDetails.setRepeatRun(5); mxService.runSuite("My case", runDetails); |
|
Method name |
|
|
Input parameters |
runId: int |
|
Return type |
CaseRunResult |
|
Throws |
Exception |
|
Description |
This method is used to get the run details of a specific run |
|
Example |
CaseRunResult runResult = mxService.getCaseRunResult(1563); |
|
Method name |
|
|
Input parameters |
suiteName: String |
|
Return type |
SuiteRunResult |
|
Throws |
Exception |
|
Description |
This method is used to run a suite |
|
Example |
mxService.runSuite(“My suite”); |
|
Method name |
|
|
Input parameters |
suiteName: String runDetails: RunDetails |
|
Return type |
SuiteRunResult |
|
Throws |
Exception |
|
Description |
This method is used to run a suite with additional run details |
|
Example |
RunDetails runDetails = new RunDetails(); runDetails.setSyncAsync(SyncAsync.SYNC); runDetails.setRepeatRun(5); mxService.runSuite("My suite", runDetails); |
|
Method name |
|
|
Input parameters |
runId: int |
|
Return type |
SuiteRunResult |
|
Throws |
Exception |
|
Description |
This method is used to get the run details of a specific run |
|
Example |
SuiteRunResult runResult = mxService.getSuiteRunResult(135); |
|
Method name |
|
|
Input parameters |
runId: int |
|
Return type |
void |
|
Throws |
Exception |
|
Description |
This method is used to stop an active run |
|
Example |
mxService.stopRun(1235); |
Node Pools
Common Pool
The common pool is a pool of selenium nodes that you can run cases on. By default, it is a shared pool that all MaxTAF Cloud users can use between themselves. When you run a case on the common pool, it is added to a queue. After checking for availability the case is sent to the first available selenium node, where it is executed. If all the nodes are busy, the case will wait in the queue until it can be executed. As soon one of the nodes becomes available again, the case will be executed.
In order to use common pool to run your case/suite, do the following:
- Go to Cases/Suites and choose a case/suite
- In the “Params” section click on the pencil icon to edit parameters for that case/suite
- Set the mx.selenium.server parameter to ${mx.system.common_pool} as shown in the picture below: mx.selenium.server=${mx.system.common_pool}
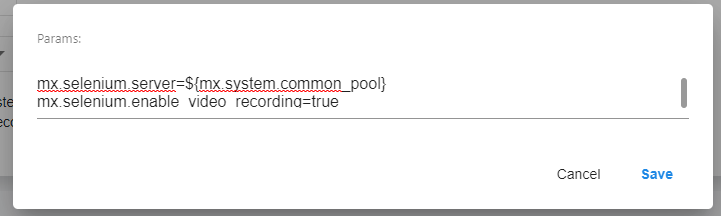
If your MaxTAF license allows it, you can use the common pool to run cases in parallel. Free users can not run parallel cases. MaxTAF Cloud will give you an error if you try to run too many. If you exceed the common pool node limit with parallel runs, it will add the extra cases to a queue.
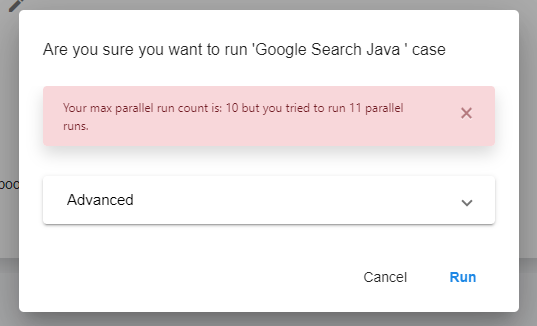
Reports
Basic Reporting
MaxTAF has basic run results that are accessible immediately after a case or suite has finished running.
You can access this in a few ways:
After a case run
You should be taken straight to a basic report after your case has begun running. When completed it will update with the final information of that case run.
Completed runs section
Runs (left hand menu) -> Completed
This is a raw list of all runs completed on the system. It can be useful for understanding the entire scope of testing that is ran at any one time across your entire project.
Details
Most of the details are self explanatory here, but there are some things you could miss:
Failures: If a case fails, details of the failure are presented.
This includes whatever failure message has been prompted, as well as the stack trace for the failure in the script code.
Pressing the Line number (e.g Line 19 in the image below), will open the code tab lower in the report, and take you to the precise line where the case/script failed.
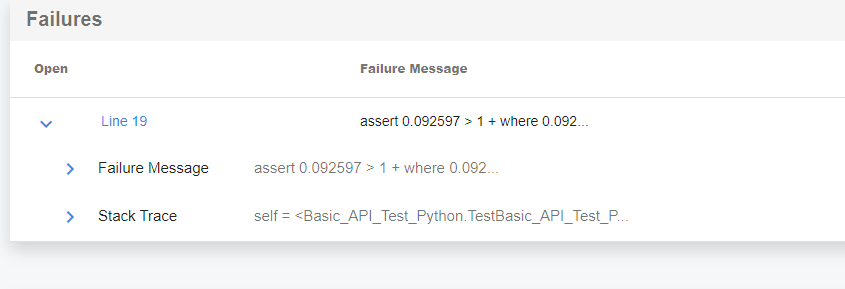
Log: if the script prints anything to the log, this is shown in the log dropdown. Note: this will update live as the case runs.
Console Output: Details the output of the browser console during the script run.
Params: details any params used during the case run.
Code: presents the code used during the run. Useful for version control/record keeping etc.
Allure (Graphical Reporting)
Allure is an open-source framework designed to create test execution reports that are clear to everyone in the team. You can read more about allure on Allure official website.
MaxTAF Cloud has integrated support for Allure reports. Each run automatically generates an Allure report.
How to generate an Allure report?
MaxTAF Cloud automatically generates an Allure report for each run. You can view the generated report from the Run details page by clicking the Allure report button.
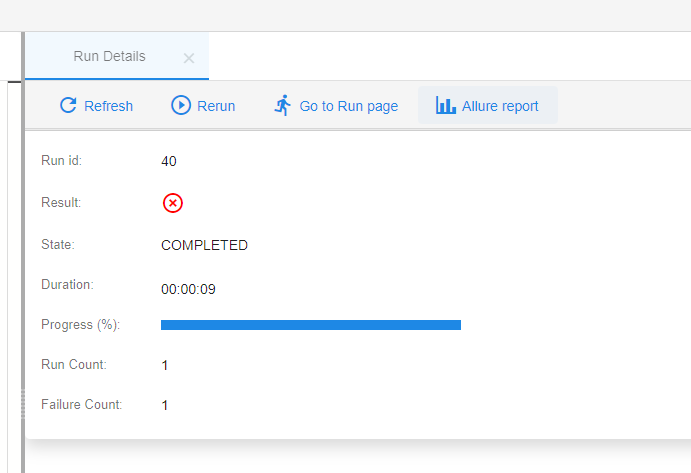
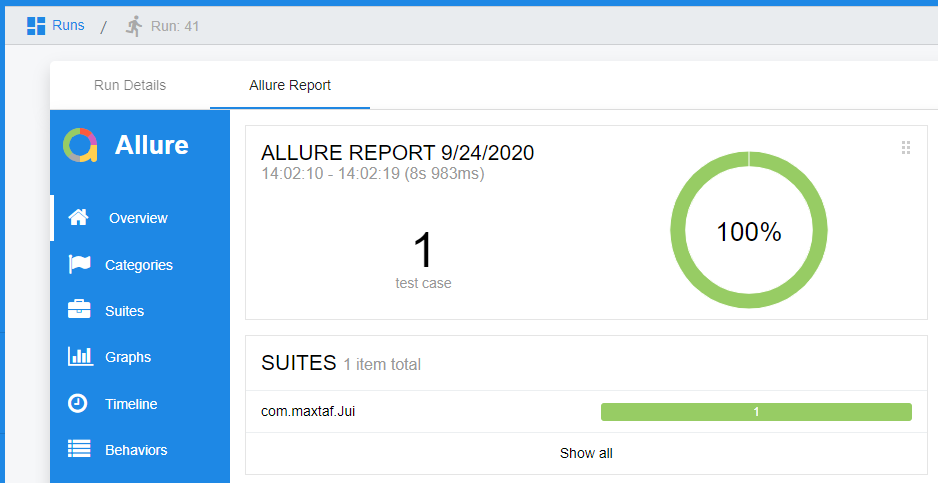
Can I generate an Allure report for multiple cases?
Yes you can. First, you have to create a Suite with the cases you want. When the Suite is ready, run it. After the run is completed you will be able to click Allure report button.
Collaboration
Examples Project
About Examples
The examples project is a community driven project of example cases.
It is intended for MaxTAF users to refer to for their own automation problem solving tasks.
Every user is included in the examples project by default.
Uploading to examples
Any user can upload new cases to the examples project, in the same way they would do for their own projects.
Finding Examples
Example cases can be found by accessing through the project page or by switching projects using the menu at the top of the screen.
You may also use the Code Lookup in the script tab for a case and find other cases to lookup from Examples.